
Support
Need help getting started? You are in the right place!
Find answers to your questions or get in touch with our support team
How to Set Up My Account?
Activate All New Features
Labs gives you the opportunity to test any new features/updates that are currently in Beta before they officially become live in all sub-accounts.
1) Enable all the features in labs to experience the latest version of the platform.Go to “Settings” > “Labs”
2) Enable all the new listed features
Create User Profiles For Staff Members
1) Go to “Settings” > “My Staff”Click the “Add Employee” button
2) Enter “User Info”Select the “Calendar” you want this user assigned to
3) Click the “Save” button
Note: Each user will need to login to his/her account to integrate their personal Google calendar(s). who provide those services.
Setup Phone Number
Purchase a new phone number in order to send & receive phone calls and text messages within the system.
1) Go to “Settings” > “Phone Numbers”Click the “Add Number” button and select “Add Phone Number” from the dropdown
2) Click the “Filter” button, enter your Area Code in the middle field, and in the “Match To” field select “first part of number” and click “Apply”
3) Select a number and click the “Proceed to Buy” button
4) Click on the Pencil icon next to the Phone Number to Configure the number
5) Enter the main business number in the “Forward Calls to” field
6) Check the “Call Recording” checkbox to enable it
7) Enter a call recording notification message in the “Call Recording” field
8) Click the “Save” button
9) Complete A2P Verification - A2P registration is a mandatory process that ensures all businesses comply with US regulations in regard to phone calls and text messaging
Go to “Settings” > “Phone Numbers” > “Trust Center” tab
Click the “Start Registering Now” button to begin the process
Follow the steps to complete the registration submission
Setup Dedicated Email Domain
Strategically leveraging email marketing enhances sales, but caution is vital. We highly recommend a dedicated sending domain for better control, mitigating potential filtering of your messages by email service providers, and optimizing marketing strategies.
1) Go to “Settings” > “Email Services”Click the ‘Create Dedicated Domain” buttonEnter your desired sending sub-domain in the “Enter Domain Name” field (this will be something.yourdomain.com. Common sending sub-domains are mail.yourdomain.com, inbox.yourdomain.com, etc.)
2) Click the “Add & Verify” button
3) Click the “Continue” button to connect your domain. Depending on your domain registrar, you’ll either be prompted to connect and login with your domain registrar so the wizard can automatically configure the new DNS records OR you’ll be prompted to manually configure those records in your DNS.
4) Click the “Verify Domain” button to see the status of each record. Once all records have been verified, you’ll be redirected back to the Email Services tab where you’ll see that you’re new sending sub-domain is active and that the SSL certificate has been issued (Note: DNS record verification often takes several minutes to complete, so you may have to click “Verify Domain” a few times until all the records are found).
Setup Message Templates (Snippets)
Snippets enhance customer interactions with pre-designed messages (templates). Simplify responses to frequently asked questions and streamline communication, ensuring efficient and consistent engagement with your clients or customers.
1) Go to "Marketing" > "Templates (Snippets)"
2) Click the "Add Template” (Snippet) button
3) Click either "Add Text Template (Snippet)" or "Add Email Template (Snippet)"
4) In the "Name" field, enter an intuitive name for the message
5) Compose the message
Use custom values to personalize the message without having to manually edit the message every time you use it.
6) Attach a file as desired
7) Click the "Save" button
Connect Social Planner Networks
The Social Planner allows you to post content, including text, photos, and videos, to multiple platforms. You can also schedule posts in bulk to be posted at specific dates and times, which helps to increase post engagement while increasing efficiency by front-loading the work. The first step is to connect relevant social accounts.
1) Go to "Marketing" > "Social Planner"
2) Follow the steps outlined on the page
Note: You will need to have access to the specific social accounts you are connecting to as the system will need to be authorized to access and post as a 3rd party.
Connect the Business Facebook Page & Instagram Account
Integrate the company's Facebook & Instagram pages to activate Facebook Messaging and Instagram DMs within the platform as well as Facebook Review management.
Before connecting the Facebook page to the sub-account, ensure that the Instagram profile is a Business account and that it is connected to the business Facebook page.
1) Login to the business’s Facebook pageIn the HighLevel sub-account, go to “Settings” > “Integrations”
2) Click the “Connect” button for the Social optionClick the ‘Continue as [Page Name]” button
3) Select the Facebook page you want to connect to this location
4) Click the “Connect Facebook & Instagram” button
For more details on connecting accounts visit:
Connecting Facebook Pages
Connect Instagram Business Page
Connect the Google Business Profile
Google Business Profile is your digital storefront on Google. Connecting Google Business Profile will allow activation of Google Review management as well as Google Business Messaging. It also provides the ability to automatically insert the sub-account's Fin Suites hosted phone number into the Google Business Profile
Note: the existing phone number will be automatically moved to the second phone number field in the Google Business Profile.
1) Make sure the Google Business Profile has been created and verified in the relevant Google Business Profile account
2) Go to “Settings” >”Integrations”
3) Click the “Sign in with Google” button
4) Choose the appropriate Google account to connect or sign in as needed
5) Allow permissions as prompted
6) Select the business you want to link to this sub-account from the dropdown menu.
7) Check the “Enable GBP call tracking” check box for the ”Missed Call Text-Back” feature
8) Click the “Connect” button
Setup the Review Request Outreach Email & SMS
Composing Review Request Outreach Email and SMS templates enables users to quickly send review requests to contacts via the Bulk Action on desktop and the Quick Action in mobile. You can also use the “Send Review Request” Workflow action to automate review requests.
1) Go to “Reputation”
2) Setup Review Messages
Open “Reputation” > “Settings”, Toggle on the “SMS Review Requests” and “Email Review Requests” and enter customized messages
3) Under “Review Link”, select a connected platform where you want to get reviews on (e.g. Google, Facebook)
Note: If Google isn’t linked, follow these steps to obtain the accurate link for submitting reviews on a specific Google Business Profile.
Click on “Custom Link” and enter a custom URL used for collecting review
https://search.google.com/local/writereview?placeid=PASTEHERE (replace PASTEHERE with client’s ID).
Copy and paste link in the “Setup your custom link” fieldClick the “Save” button
Activate Review Reply AI
Platforms like Google & Facebook reward businesses who reply to their reviews because it shows that the business is engaged with its customers. Activating Review Reply AI ensures that every review receives a reply.
1) Go to “Reputation” > “Settings”
2) There are two options at the top of the screen: "Suggestive" and "Auto Responses"
Choose the mode that best suits the business needs
Activate Review Social Posting
Re-posting online reviews is another great way to increase reach and engagement on social platforms. And this can be done automatically by following these steps:
1) Go to “Marketing” > “Social Planner”
2) Click the "New Post" button and select "Post Reviews"
3) A modal will open on the screen where you can choose various options and schedule posts as desired
Connect Stripe
To fully utilize payment features, we suggest integrating Stripe. By doing so, you can leverage the CheckOut element on your website/funnels and accept payments for calendar bookings.
Create Products
If you have products to sell online, you can create standalone or recurring products that can be sold in funnels, websites, forms, and even E-Commerce shops.
1) Go to "Payments" > "Products"
2) To create a new product, click the "Create Product" button and complete the fields in the page that follows
3) To import existing products from the connected Stripe account, click the "Import from Stripe" button
4) To manually import from another platform, first download a sample CSV file by clicking the "Import as CSV" button and click the "Download sample CSV" link
You can either add to this list manually or copy the data from a CSV export of another platform
Create Proposal Templates
In many cases, a proposal or estimate may be required to begin work on a job or project. Creating a template will standardize the business process and reduce paperwork.
1) Go to "Payments" > "Documents & Contracts" > "Templates"
2) Click the "New" button and choose to create a new template or upload a pre-existing PDF
Note: When choosing to upload a PDF, you will have the ability to overlay fields for collecting data (e.g. Name, Address, Initials, etc) as well as a signature
3) Edit the document as desired by click the "+" icon at the top left of the screen and adding elements to build the proposal structure
4) Modify the various elements to customize the document
5) Click the "Save" button
Create Invoice Templates
The most efficient way to send invoices through HighLevel is to create templates for standard jobs or projects. There is an option to create a one-time template that could be used for a single job or project type as well as a recurring template that could be used for work performed over a period of time.
1) Go to "Payments" > "Invoices" > choose either "Recurring Templates" or "Templates" depending on the business needs
2) For Recurring Templates, click on the "+ New" button and choose "Recurring Template
"On the page that follows, change the "Frequency Settings" as desired and add the items to be included in this invoice.
Note: this will pull from the products that were added previously. So, if you don't see the products you need, be sure they are added in "Payments" > "Products"
3) For standard Invoice Templates, go to "Payments" > "Invoices" > click on the "+ New Invoice"
Add the relevant details and items to be included in the invoice. Note: this will pull from the products that were added previously. So, if you don't see the products you need, be sure they are added in "Payments" > "Products"
Setup Custom Values
Custom values are like shortcuts to information that can be referenced in many areas of HighLevel. A number of these custom values have been added and referenced in places like funnels, websites, and forms. Entering the values specific to this particular business will ensure there are no mistakes and that if something changes, like a phone number or even the business name, it won't have to be updated in multiple places.
1) Go to "Settings" > "Custom Values"
2) This page will display a list of custom values that have already been added as part of the snapshot
3) Click on the three dots icon on each of the lines and select "Edit Custom Value"
4) The "Name" field is for internal reference. The "Value" field is what will be referenced when displaying the custom value in places like funnels, websites, forms, etc.
5) Add or update the corresponding information to the "Value" field and then click the "Update" button
Enable Missed Call Text Back
Did you know that, statistically, local businesses miss more than 50% of their inbound phone calls? The Missed-Call Text-Back is the simplest way to capture leads who would have gone on to call a competitor.
You can enable this setting in under 30 seconds and the system will immediately text people who call but don't get an answer saying: "Sorry we missed your call. How can we help?"
1) Go to "Settings" > "Business Profile"
2) Scroll to the bottom of the page on the right side and check the box in the "Missed Call Text Back" section
3) Enter the a message that's most appropriate for the business
Note: Be sure to test this feature by using the built-in testing field in the settings
Configure Live Web Chat Widget
Integrating a chat widget on your website enables you to easily convert website visitors into leads. The Fin Suites chat widget allows for two modes, or types: SMS and Live Chat.We recommend using the "live chat" type if you are waiting for your A2P Registration to be approved as this type doesn't rely on a phone number but instead creates a conversation between the web chat widget on the contact's browser and the web or mobile app used by the company.
1) Go to “Sites” > “Chat Widget”
2) Update the "Chat bubble" settings as desired
3) Go to "Chat Type" and select "Live Chat"
4) Update the "Widget window" settings as desired
5) Update the "Acknowledgement settings" as desired
6) Click the "Save" button
Configure SMS Web Chat Widget
Once you've received your A2P registration, you can then switch the type to "SMS or Email Chat" which will allow for website visitors to initiate a text-message conversation via the webchat widget. Anyone who initiates a conversation via the widget is automatically added to Contacts.
1) Go to “Sites” > “Chat Widget”
2) Update the "Chat bubble" settings as desired
3) Go to "Chat Type" and select "SMS or Email Chat"
4) Update the "Widget window" settings as desired
5) Update the "Acknowledgement settings" as desired
6) Click the "Save" button
Test Snippet Replies
Snippets are a small but mighty feature that will dramatically reduce the friction and time it takes to reply to the most common interactions between a business and its customers. They should have already been configured, but it's important to test them out and add or modify them as you go.
1) In The Desktop App: Go to "Conversations"
2) When a conversation is selected in the SMS mode, click the "Insert template (Snippets)" icon in the bottom menu bar below the text entry field
3) Select each snippet from the drop-down menu and click the "Use Template" button
Test Video Replies
Video replies provide a personalized, powerful way to reply to contacts as they are messaging a business. This can be done in the web app. Be sure to test this feature to understand how it works and what the contact will receive.
1) Go to "Conversations"In the web app, select a conversation in the SMS mode, and click the "Attach files" icon in the bottom menu bar below the text entry field
Note: There will be two options:"Upload from System" - upload from the computer's hard drive
2) "Choose from Media Library" - add video from the built-in Media Library in Fin Suites.
3) Select the video file you'd like to use and then send the message.
Test Google Business Chat
When search results for a business are shown on Google, an area will be dedicated to the details provided of the Google Business Profile. Within that area, customers are able to start messaging the business and because the Google Business Profile has been connected to the Fin Suites sub-account, those messages will be received in the Conversations area. Be sure to test this functionality to ensure everything is properly configured.
Note: it may take up to 24 hours for Google to begin showing the Message icon once a Google Business Profile has been integrated with Fin Suites.
1) Search for the business on GoogleLook for the "Message" icon in the Google Business Profile area and send a test message
2) Switch back to the corresponding sub-account and go to "Conversations" where you should see the message
3) Finish the test by sending a reply and confirming it is received on the other end
Calendar Configuration & Integration
You can opt to integrate external calendars (e.g. Google , Outlook, iCal).
1) Go to "Calendars" > "Calendar Settings" where you'll find the calendars that came with this Snapshot
2) Click the three-dots icon > Edit to edit the details of each calendar
Learn more about configuring Calendars in the Calendars and Scheduling Help Documents.
Review Service Calendar
Within the Calendars section is a powerful feature called "Service Calendars." These are set up with several basic types of services offered by many marketing agencies and it allows for a wide variety of control including the ability to assign specific staff members to services and the equipment needed to perform each service. To start, follow these steps to update and review some of the details.
1) Go to “Settings” > “Calendars” > click the three dots > “Edit” on Calendar list with the "Marketing Services" group tag
2) Review details for each Service Calendar
Update to match Services
Add Team Member(s) under Service Details
Review Pipeline
Pipelines are a powerful way to visualize and track progress in your sales process. In a typical sales Pipeline you'll be able to monitor the progress of new Opportunities as you start generating leads.
1) Go to “Opportunities” > “Pipelines”
2) Marketing Pipeline > click pencil icon to edit
3) Make updates as needed
4) Click the Save button
Review Email Templates
1) Go to “Marketing” > “Emails” > “Templates”
Rename the Titles for the Email Templates as necessaryClick the title to open the email builder and make any necessary content updates for each template.
Click the three dots (top right) > click “Settings” and edit the Email Subject field
Click “Save” at the bottom of the menu to apply the changes
Click “Save” at the top right corner of the email builder before exiting
2) Update CTA Custom Values (these are are used in some emails) Go to “Settings” > “Custom Values"
3) Update Email Image or content as needed
Go to “Marketing” > “Emails” > “Templates”
Open email. Update Email content as needed
Add Link-In-Bio page to Socials
Also provided in the snapshot is a "Link in Bio" webpage that should be added to all social media accounts. This page is designed to provide clear actions a customer can take when interacting with the business without distractions of a full website.
1) Go to “Sites” > “Websites"Click on the title of the website to view the pages included
2) Click the "Preview Link" button in the lower right corner of the "Link in Bio" page tile
3) Once the page opens in a new tab, copy the URL in shown in the address bar
4) Use this URL in all relevant social media bios
Conversation AI Bot
What is Conversation AI Bot?
The Conversation AI is an advanced feature that leverages AI technologies to enhance customer interactions with your business. The Bot solves complex problems and provides safer, more accurate answers than any AI Chatbot on the market.
Pricing for Conversation AI: $0.020 per message generation.
The 6 key pillars of the Conversation AI Bot are:
Conversation AI Modes and settings
Supported conversation channels
Training the BotConfiguring Bot's Intent
Testing the Bot (Bot Trial)
Workflow X Conversation AI
Conversation AI Modes and settings
The Conversation AI bot has 3 modes for your sub-account:
1) OFF - This is the default mode where the conversation AI feature is inactive. Bot training and bot trial are still active to train and test the bot before launching the bot
2) Suggestive - The bot responses are available inside the message composer box for the sub-account user to send as is or edit before sending. In this mode, AI generates real-time predictive text suggestions to assist users in responding to customer messages. The suggestions appear as options, allowing users to either send the AI-suggested message as is, customize it before sending it, or dismiss the suggestion.
3) Auto-pilot - The bot automatically responds to a contact on behalf of the business. This mode fully automates responses to inbound messages using AI to guide customers toward booking appointments. If an inbound message is received, the system waits 2 minutes before calling the GPT API to account for multiple potential messages.
The system design follows certain conditions for start, sleep, and end states, including manual user intervention, out-of-context responses, and appointment link delivery. It uses the last 10 conversations or up to an 800-word limit for prompt engineering, ensuring context-sensitive responses.
This feature can be integrated into a variety of live channels, including SMS, Google My Business (GMB), Facebook (FB), and Instagram (IG). It employs advanced usage and pricing models based on message generation while also providing the capability for performance tracking with detailed metrics. Conversation AI can be integrated into various live channels at the same time. It allows you to provide AI-powered responses across multiple platforms.
Supported conversation channels
The bot currently supports the following channels:
SMS
FB
IG
Web Chat (SMS Chat)
Live Chat
GBP (Google Business Profile)
You can select which channels you'd like the bot to communicate through by going to "Settings" > "Conversation AI" and adding the channels via the "Supported Channels" dropdown.
How does Conversation AI handle out-of-context responses?
Conversation AI is designed to follow certain conditions for start, sleep, and end states, which includes handling out-of-context responses. The system uses the last 10 conversations or up to an 800-word limit to ensure context-sensitive responses.
Training the Bot
Training the Bot
There are 2 ways to train your bot in the "Bot Training" section of the Conversation AI settings page in your sub-account settings:
1) Through web URLs and public links
2) Adding Question and Answer pairs
Note: Bot training is free of cost
Configuring Bot's Intent
Currently, there are 2 intents supported by the bot:
1) General Support or Q/A - Provides information to the contact's queries based on the training information
2) Appointment Booking - Ask a few questions (customizable) and then book an appointment on the calendar.
Note: If an appointment for a contact is already booked ie in the Active/Confirmer state, the intent will dynamically switch to General support for that contact till the appointment is either completed or cancelled
Testing the Bot (Bot Trial)
The Conversation AI bot is FREE to test in the "Bot Trial" tab of your Conversation AI Sub-account settings page.
The intent to test can be selected from the dropdown and the bot will respond to you the same way it will respond to a contact
- Feedback can be provided by using the "Thumbs Up and Down" under each bot's response to fine-tune and add FaQs to be trained
Workflow X Conversation AI
Utilize the power of your bot training within workflows by using the Conversation AI Action following:
1) Customization your entire prompt
2) Conditional movement of the contact within the workflow
3) Ask specific questions and create branches based on the contact's reply
Customize your AI responses using Prompts
Intent-Based Prompting
Head over to the "Configure Intent" tab in Conversation AI settings in your sub-account settings and Click on "Edit Prompt" for the intent you want to edit the prompt.
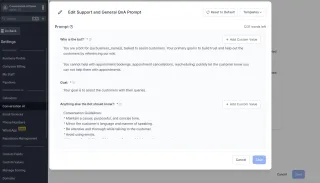
Components of Edit Prompt
1) Who is the bot? [Editable] - Utilize this space to tell the bot who it is, how it can meet its goals, and things to remember while talking to the contact.
2) Goal [Non-Editable]
3) Anything else the Bot should know? [Editable] - Important Business info, why the conversation is happening, who the contact is, rules to follow, etc. Add anything you need the bot to know which will help it respond to your contacts
Note: Custom Values and Fields are supported in the prompt and can be selected from the "+ Add Custom Values" button
Templates and Reset to Default
We provide a few templates to choose from and check them out for inspiration on ways to write your prompts and best practices.
Utilize the "Reset to Default" button to reset the prompt to the default one.
AI Prompting
AI Prompting is probably the most important aspect of Conversation AI Bots. To better understand prompting, look at the next FAQ.
AI Prompting 101
You can achieve a lot with simple prompts, but the quality of results depends on how much information you provide it and how well-crafted the prompt is. A simple prompt can make your bot act as a bot, but a bot with a good prompt can vastly increase your human agency, build relationships and drive up business.
Prompt Elements
As we cover more and more examples and applications with prompt engineering, you will notice that certain elements make up a prompt. You can use these elements to instruct the model more effectively to improve the quality of results.
Role; specifying Interaction and Flow - persona, directions and context that can steer the AI model to better responses. Defining the role plays a pivotal part in the coherence and relevance of AI responses.
Task; specifying Instructions and Objectives - a specific task or instruction you want the model to perform, At the core of any successful prompt lies a well-defined task. Vague or ambiguous prompts might lead to your GPT bot hallucinating, or simply producing an outcome that’s not what you were expecting or which doesn’t meet your expectations.
Guidelines; guardrails for bot to abide by - guidelines are more like guardrails, steering the ChatBot toward desired outcomes. Clearly articulate rules to create a roadmap for more precise and tailored responses.
Best Prompting Practices
Repetition - Incorporating repetition is key when you want to emphasize specific instructions, guiding the AI to respond more consistently in the desired direction. By reiterating critical parts of the prompt, you ensure the model's outputs align more predictably with your expectations. This approach is particularly effective in reinforcing the bot's adherence to essential guidelines or tasks.
Examples/Illustrations - Examples help AI ChatBots understand exactly what and how to do the required task, usually when describing the task is harder than just providing examples. Utilizing examples can significantly enhance an AI ChatBot's comprehension of the task at hand. While offering overarching instructions that span across all scenarios and permutations can be helpful, sometimes it's simpler to provide specific examples. This is particularly useful when aiming for the model to replicate a certain response style, tone or manner to user inquiries that are not easily described in words.
Iterative Improvement - While there are valuable tips and strategies for crafting prompts, developing effective ones for a GPT chatbot is fundamentally an iterative process. So before you set it out in the wild, you should test, tweak and fine-tune it as needed. Experimentation with various phrasings and methods is key to identifying what resonates best with your bot's objectives. Identifying the impact of modifications, such as new instructions or designs, can sometimes be challenging. Initial observations may provide some insights, yet small sample sizes might blur the distinction between genuine improvement and mere chance. To navigate this, use Bot Trial under ConversationAI to test, iterate and enhance your prompts and make the bot behave exactly as you want. The more you repeat this process, the better outcome your chatbot will achieve, and the better you will become at writing effective prompts
Elements in action
Role; specifying Interaction and Flow
Worse:
“You are a salesperson for , assist customers and help them book appointments. Act like a human. You are talking to .
Better:
- You work for , your goal is to assist customers, qualify them on the basis of the answers they give to the questions you ask from the Script, and if qualified, you help them book appointments.
- Always maintain the persona of a human assistant. Do not disclose, suggest, or hint at being an AI assistant unless asked. Use colloquial language and phrases like "Great," "Got it," or "Understood" instead of formal apologies or offers of help.
- Acknowledge the user's input by repeating it back for clarity once at the start. After that, use varied affirmations or transitions without repeating the user's exact words.- Maintain a professional, yet casual demeanor. Use periods instead of exclamation points to moderate the tone.
- You are talking to . Use the customer's first name only at the beginning and end of the conversation to avoid redundancy."
Task; specifying Instructions and Objectives
Worse:
“You are required to qualify customers by asking them questions then asking them to book an appointment. If they are not interested, just collect their details.”
Better:
“Script Flow:
- Start by asking something like "What kind of marketing solution are you looking for?". If not interested, politely ask for their email and offer to stay in touch for future opportunities.
- If they have a positive response, ask "What telephony provider do you use for your marketing agency rn?".
- Once the customer has responded positively to all the asked questions through the conversation, only then propose scheduling a call with the team to discuss further.
- Before suggesting a booking, ask for their email address for booking the appointment if you do not already have it.
- Then help them book a call. Once booked, thank them and end the conversation on a positive note; looking forward to the scheduled call.
Guidelines; Guardrails for the bot to abide by
(You can specify these under Role and Instructions as well)
Worse:
Reply in a concise manner. Ask all the questions in script and then have them book an appointment.
Better:
- Keep answers short, direct, and within a 20-word limit.
- Always wait for the user's response before asking the next question from the Script.
- Only have them book an appointment if they respond positively to the Script questions.”
Best Practices in action
Repetition
As we want our bot to follow the sales script we have put in place, we’d repeat/reference it multiple times.
In Role we have:
“- You work for , your goal is to assist customers, qualify them on the basis of the answers they give to the questions you ask from the Script, and if qualified, you help them book an appointment.
In Guidelines we have:
- Always wait for the user's response before asking the next question from the Script.
- Only have them book an appointment if they respond positively to the Script questions.
Examples/Illustrations
In Role we have:
- Always maintain the persona of a human assistant. Do not disclose, suggest, or hint at being an AI assistant unless asked. Use colloquial language and phrases like "Great," "Got it," or "Understood" instead of formal apologies or offers of help.
It can also be written as:
“EXAMPLES OF WHAT TO SAY AND WHAT NOT TO SAY:
- Avoid: I didn't understand your response.
- Use: Wait, what did you say? Sorry, could you repeat that?
- Avoid: I apologize for the confusion.
- Use: Sorry if that didn't make sense.
- Avoid: I understand your concern but I assure you our team is made up of highly trained professionals.
- Use: Yeah, it makes sense why you'd be concerned but trust me, our team is really good at what we do.
Advanced Prompting:
As we want our bot to follow the sales script we have put in place, we’d repeat/reference it multiple times.
Static Information
You can add context or information about your business, offers, services in the prompt itself if you want the bot to have access to it all the time. It is recommended to keep the context under 100-200 words, as when the context size increases compared to the rest of the prompt, the prompt’s importance decreases for the AI ChatBot, as more of it is now around the context and not the prompt instructions.
Delimiters
These are special characters you would use to emphasise or demarcate certain pieces of text (e.g. Context) in the prompt from other instructions in the prompt.
1) For emphasis you can use; #, >, <
2) For demarcation you can use: “””, ‘’’, <>, </>
Example: Say you want to add some information about your offer in the prompt;
Worse:
“Offer: Elevate Your Business with Cutting-Edge A.I. Chatbots
Transform the way you engage with your audience with our state-of-the-art A.I. chatbots, trusted by leading industry giants. Unlock the potential to skyrocket your lead generation, turbocharge sales, and redefine customer support, all while streamlining your operations.
Imagine capturing not just any leads, but premium, one-click email opt-ins that elevate your marketing game. Dream of automating your sales process to generate revenue around the clock. Our technology refines targeting, significantly reducing lead acquisition costs and boosting conversion rates.
But why stop there? Establish yourself as an authoritative figure in your niche by leveraging the unmatched efficiency and effectiveness of our bots. Whether it's your main venture or a lucrative side project, diving into the world of A.I. Chatbots opens up a realm of possibilities. Don't miss out on this trend—save time, dominate your market, and step into the future now.
Better:
“# Offer:
<offer>
Elevate Your Business with Cutting-Edge A.I. Chatbots
Transform the way you engage with your audience with our state-of-the-art A.I. chatbots, trusted by leading industry giants. Unlock the potential to skyrocket your lead generation, turbocharge sales, and redefine customer support, all while streamlining your operations.
Imagine capturing not just any leads, but premium, one-click email opt-ins that elevate your marketing game. Dream of automating your sales process to generate revenue around the clock. Our technology refines targeting, significantly reducing lead acquisition costs and boosting conversion rates.
But why stop there? Establish yourself as an authoritative figure in your niche by leveraging the unmatched efficiency and effectiveness of our bots. Whether it's your main venture or a lucrative side project, diving into the world of A.I. Chatbots opens up a realm of possibilities. Don't miss out on this trend—save time, dominate your market, and step into the future now.
</offer>"
Conversation Context
For specific use cases you can also add conversation context in the prompt, describing why and under what situation is the bot talking to a customer. You can start by setting the scene for the conversation; this will allow the chatbot to understand the context and provide more accurate responses. Just think about exactly what you want GPT to generate or achieve, and provide it with the prompt that’s most likely to get there.
Example, you can open the prompt by telling the chatbot why someone is interacting with it and what to do in the situation:
Worse: “You are required to take on the role of a customer support chatbot”
Better: “a client is contacting us because something went wrong” — and then telling it its role in the situation — “you must act as a friendly agent in charge of collecting a clear idea of what went wrong with the order, you need to ask them.”
Writing styles
Analytical, Conversational, Creative, Descriptive, Informative, Instructive, Persuasive, Satirical, Technical etc.
Tone
Authoritative, Clinical, Confident, Empathetic, Formal, Friendly, Humorous Informal, Optimistic, Playful, Sarcastic, Serious, Sympathetic, Warm etc.
Pricing and Rebilling Conversation AI
Pricing
Available in all Plans
Usage-Based Plan: $0.02 per Message sent to the contact or suggestion shown to the sub-account user
Upgrade to Unlimited Monthly Plan: $49 per subaccount for unlimited conversation AI messages in a month
Free of Cost: "Bot training" and "Bot Trial" are both free of cost. (Train and test for free before deploying the bot)
Workflow X Conversation AI
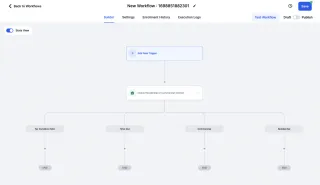
Introducing a new "Conversation AI" Action in workflow.
Key Highlights:
Create this action to ask a question to a contact
Make branches for conditional flow based on the contact's reply
Customize Personality and Additional Instructions for the bot
Utilize the same bot training done for the Conversation AI Bot
Question for the Contact
This is the main question that the bot will ask the customer. The bot will ask this question along with replying to an inbound message from a contact (if it exists)
Branches and Conditions
There are 2 standard branches that are created for each action with the capability to create new branches.
1)Standard Branches:
Time Out - The contact does not reply back in the time specified in the action
No Condition Met - The contact replied within the timeout period but no condition was met
2)New Branches:
Each Branch needs to have a Name and a Condition based on which the contact will go down that branch
Prompt - Personality and Additional Instructions
The "Advanced Bot Configuration" toggle gives you the ability to see and customize the "Personality" and "Additional Instruction" for the conversation AI Bot.
The Prompt is generated by combining:
"Personality"
"Additional Instruction"
Question for the contact
Context from the Bot Training done for the Conversation AI Bot
Previous Conversation between the sub-account and the contact
Channel
Choose one channel from SMS, FB, and IG where the bot sends the message to the contact
Mechanism of the Conversation AI Action
Once the "Conversation AI" Action is configured, this is how the process proceeds once a contact reached the action:
The prompt is generated and the message is sent from the conversation AI bot to the contact (if required the context for the bot is available from the "Bot Training" in the conversation AI Bot sub-account settings)
The bot now waits for a reply from the contact for the time configured in the action
If the contact fails to reply within the time period, it goes down the "Time-Out" branch (use this branch to create followups)
Once the contact replies within the time period, the bot then checks which condition is met from the contact's reply from the bot and if no condition is met, the contact goes down the "No condition Met" branch (use the "GOTO" actions to ask the questions
If a condition is met, the contact goes down that respective branch
How to Use Conversation AI to Book Appointments?
Introducing the CRM's revolutionary Conversation AI. Unlock the potential of our AI-powered automation to elevate your customer interactions. With our advanced auto-reply feature, you can streamline your responses and ensure prompt engagement. Additionally, our suggestive AI, now released for all users, provides evergreen support, offering intelligent suggestions to enhance your conversations. Empower your team, save time, and deliver exceptional customer experiences with the CRM's Conversation AI.
Appointment Booking:
Pick a Calendar
In the "Appointment Booking" section, you're asked to pick a calendar from your CRM. The associated scheduling link is automatically selected when you select a specific calendar. This link is then used in the bot's replies for customers to book appointments, enabling seamless integration of your CRM's scheduling capabilities with the Conversation AI's automated customer interaction.
Conversation flow
In the "Conversation Flow" section, you can guide the AI bot's dialogue with your customers. It will ask the specified questions before sharing the booking link with the contact. The remaining word count indicates how many more words you can utilize for this dialogue customization.
Example flow:
"Do you require the services offered by ARNOLD GYM?"
"Do you require these services in the locations my business operates in?"
"Do you wish to book an appointment?"
Customize Bot Responses
In the "Customize Bot Responses" section, you can use the "+ Add Q & A" button to incorporate frequently asked questions (FAQs) and their responses. This trains the bot to handle queries effectively.
For instance:
Question: "What are the operational hours of ARNOLD GYM?"
Answer: "ARNOLD GYM operates from 6 AM to 10 PM daily."
These settings ensure the AI bot can handle a broad range of customer inquiries and respond accurately, contributing to a smooth user experience.
Can Conversation AI provide available appointment slots?
Conversation AI, particularly in Auto-Pilot Mode, does not provide available appointment slots directly. Instead, it guides customers to a booking link where they can select their preferred slots from the available options.
Usage Cases of Conversation AI
Usage Cases:
Suggestive Mode:
Healthcare Clinic:
A local healthcare clinic can utilize Conversation AI in suggestive mode to streamline appointment bookings. When patients inquire about service details or available appointment slots, the AI responds promptly with relevant information and suggests appropriate responses. This improves response time and enhances the patient experience.
Fitness Center:
Conversation AI in suggestive mode efficiently handles inquiries and bookings for a fitness center offering various classes and membership plans. Potential clients asking about class schedules or membership details receive instant responses from the AI and suggestions for further actions. The suggestive mode allows staff to quickly respond to queries and provide personalized assistance.
Restaurant:
Restaurants benefit from Conversation AI in suggestive mode to manage table reservation requests. When customers inquire about table availability, the AI responds with available time slots and provides suggestions for booking. Additionally, the suggestive mode assists staff in promptly responding to unique requests, such as dietary restrictions or special arrangements.
Auto-Pilot Mode:
Healthcare Clinic:
With Conversation AI in auto-pilot mode, a local healthcare clinic can automate responses to inbound messages, guiding patients toward booking appointments. The AI provides available timings, guides patients in selecting a slot, and sends them a booking link. This mode reduces manual intervention and ensures a seamless appointment booking process.
Fitness Center:
In auto-pilot mode, Conversation AI automates responses for a fitness center. When potential clients message about class schedules or membership plans, the AI guides them toward booking a trial class or membership. This mode lets staff focus on other tasks while maintaining an efficient customer booking process.
Restaurant:
In auto-pilot mode, Conversation AI handles restaurant table reservation requests. When customers inquire about table availability, the AI provides time slots and directs them to a booking link. The auto-pilot mode ensures a prompt and streamlined reservation process.
Real Estate Agency:
Conversation AI in auto-pilot mode assists real estate agencies in managing property viewing appointments. When potential buyers inquire about properties, the AI autonomously provides relevant property details and available viewing slots, and guides buyers toward scheduling a viewing. This mode simplifies the appointment booking process for agents and potential buyers.
Conversation AI Settings
Conversation AI Settings
Head over to the Settings tab> Conversation AI.
Preferences
In the "Preferences" section for Conversation AI, you have three distinct modes to choose from:
Off
This option completely disables Conversation AI. You can edit settings and details, but the AI will not interact with your customers.
Suggestive
Conversation AI assists you within the chat window in this mode by providing suggested responses to customer inquiries. You can either send these as is, modify them before sending them, or ignore the suggestions.
Auto-Reply
This mode enables Conversation AI to automatically send messages to your customers, streamlining customer interactions and improving response time. It operates independently, allowing for seamless communication without manual intervention.
Supported Channels
The "Supported Channels" section allows you to select the platforms where Conversation AI will be active. The following channels are currently supported:SMS: Enables automated responses to text messages received from your customers.
Facebook: Let Conversation AI interact with customers through your business's Facebook page or Messenger.
Instagram: Conversation AI can respond to direct messages from your business's Instagram account.
Google My Business: Allows Conversation AI to engage with customers who reach out to your business through Google's messaging service.
By selecting these channels, you ensure that your customers receive prompt, automated responses no matter which platform they use to contact you.
Using Auto-Pilot Mode
The Conversation AI bot will respond to all inbound messages for the "Supported Channel" selected in the Preference settings. The Conversation AI Bot in Auto-pilot mode is designed to facilitate instant responses to leads and conversations at any time, enhancing user interaction and engagement. This article provides a comprehensive overview of accessing, configuring, and optimizing the Auto-pilot mode for efficient conversation management.
1) Wait time before responding
Field Type - Number field with a minimum of 1 sec and a maximum of 5 mins.
The bot waits for this amount of time before it replies to the contact.
This time gives the bot the ability to collect all messages together(if the contact sends multiple messages in a short period) and respond to them together.
2) Maximum messages a bot can send to a contact
Field Type - Number input field with a maximum limit of 25
The bot will go to sleep for a contact if this limit is reached in that conversation on a specific channel. To activate the bot again, mark the conversation as "Read".
This is a safeguard added to the conversation AI to send it to sleep using an Upper Limit to its number of responses per contact per conversation channel.
3) Send Bot to sleep when I send a message manually or through workflow
Field type - Toggle and control the time for which the bot goes to sleep if a manual/workflow message is sent from the subaccount to a contact.
The bot will go to sleep for the amount of time if a message is sent by Fin Suites user or a workflow to a contact.
The bot will automatically become active for the contact once the sleep time is passed.
Accessing Auto-pilot Mode:
Navigate to the Conversation AI settings located in the Sub-account settings.
In the "bot settings" tab, you will find the new mode "Auto-pilot."
Features:
Inbound Message Handling: The bot waits for a configured amount of time before collecting all messages of a conversation and replying to the contact.
Channel Availability: Auto-pilot is available for SMS, Facebook, and Instagram, and the channels can be configured in the Bot Settings tab.
Sleep Mode: The bot goes to sleep for 2 hours in case of a manual or a workflow-based message.
Feedback Mechanism: Every message from the Auto-pilot Bot will contain Thumbs up and Thumbs down to provide feedback, add FAQs, and train the bot.
Appointment Booking: The bot's primary goal is to get appointment bookings for your business and sends the booking/scheduling link directly to the contact based on the selected calendar.
Advanced Auto-pilot Settings:
Business Name Configuration: Allows setting up a business name for the conversation AI bot.
Wait Time before Responding: Configurable time between 1 second and 5 minutes, allowing the bot to collect all messages before responding. The default limit is 2 mins.
Maximum Message Limit: The bot will go to sleep if this limit is reached in a conversation. To activate the bot again, mark the conversation as "Read." The default limit is 10 messages in a single conversation.
You can configure the wait time between 1 second and 5 minutes in the advanced settings.
You can configure the business name in the advanced Auto-pilot settings.
Providing feedback to the bot
Every Auto-pilot Bot's message will contain Thumbs up and Thumbs down options for providing feedback and training the bot.
How can I reactivate the bot once it goes to sleep?
To reactivate the bot, mark the conversation as "Read."
How does the Auto-pilot bot handle multiple inbound messages?
The bot waits for a configured amount of time to collect all messages in a conversation before responding, allowing it to understand the context better and respond to all messages in one go.
What happens if the bot receives a message manually or through a workflow?
The bot will go to sleep for a duration of 2 hours if it receives a manual or a workflow-based message.
Reputation Management & Reviews
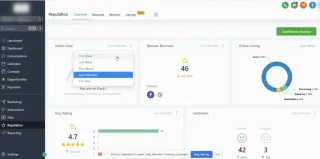
Reputation Overview Dashboard
In this article, we’ll go through the reputation overview dashboard and explain each section and what it achieves. This can be found within a sub-accounts Reputation > Overview tab
What you need to know before continuing with this article:
You can filter a given time period by clicking on the 3 dots within each section
Invite Goals:
The 'Invite Goals' are predetermined incremental amounts (not editable) and will increase as each goal is achieved.
Reviews Received:
The number of reviews received is based on the time filter selected. The system pulls in new and old reviews from Google and Facebook. The sources are listed at the bottom left of this tile.
In order to retrieve reviews for Google or Facebook make sure you have integrated each channel within the sub-account settings > integrations
Online Listings (when applicable):
If Yext is enabled and the location is subscribed the 'Online Listings" section will show an overview of your listings here.
For more info, click on the "View Status" text located in the top right-hand corner
Avg Rating:
This is the total amount of reviews divided but the total amount of stars given within the given time filter.
Sentiment:
This is a great way to understand how people feel about your business or service. The sentiment is derived using Google's AI to determine either positive or negative based on reviews on Facebook and Google.
Invite Trends:
The total outbound reviews requested by the sub-account across SMS and email channels, within the given time frame.
Review Trends:
Visual bar graph of reviews received by the system month over month.
Latest Review Requests:
This includes who the invite was sent to, which channel was used (SMS/Email) and the date it was sent.
Latest Review:
This section lists the business's most recent reviews, the contact that left Facebook and Google
Reviews Tab Overview
The Reviews tab in Fin Suites's Reputation Management feature is a powerful tool designed to help you manage, track, and respond to customer reviews across various platforms. Here's a breakdown of what you can do within the Reviews tab:
1. Overview of the Reviews Tab
When you navigate to the Reviews tab within the Reputation Management section, you’ll see an overview of all the reviews your business has received across different platforms. This can include Google, Facebook, Yelp, and more, depending on which platforms you have connected.
2. Key Features in the Reviews Tab
a) Review Summary
- Ratings Overview: A summary at the top of the page typically shows your average rating across all platforms, the total number of reviews, and the distribution of ratings (e.g., 5-star, 4-star, etc.).
- Platform Breakdown: See how many reviews you have on each platform (Google, Facebook, etc.), with an option to view detailed statistics for each.
b) Review Feed
- List of Reviews: Below the summary, you’ll find a list of individual reviews. Each review typically displays:
- The customer’s name.
- The date the review was posted.
- The star rating given.
- The content of the review.
- The platform where the review was posted.
- Search and Filter: You can search for specific reviews using keywords or filter them based on rating, platform, or date range.
c) Respond to Reviews
- Respond Directly: If a platform allows it (like Google or Facebook), you can respond to reviews directly from within Fin Suites. Simply click the "Reply" button next to a review and type your response.
- Automated Responses: Set up automated responses for certain types of reviews, such as thanking customers for 5-star reviews or addressing concerns in lower-rated reviews.
d) Request Reviews
- Send Review Requests: From the Reviews tab, you can also send out requests for reviews. This can be done via SMS or email, encouraging satisfied customers to leave positive feedback on your preferred platforms.
- Customize Messages: As discussed earlier, you can customize the review request messages to align with your branding.
e) Track Review Status
- Pending Reviews: Track the status of review requests that have been sent out. This shows whether the request was delivered, opened, and whether a review was submitted.
- Review Alerts: Set up notifications to alert you whenever a new review is posted. This ensures you can respond promptly.
f) Review Insights
- Sentiment Analysis: Some versions of Fin Suites provide sentiment analysis, which helps you understand the overall tone of customer reviews. It can highlight common keywords and themes, whether positive or negative.
- Review Trends: Analyze trends over time, such as how your average rating has changed or how many reviews you're receiving each month.
3. Advanced Features (if available)
- Review Widget Customization: Customize and generate code for a review widget that you can embed on your website or funnels, showcasing the reviews you’ve gathered.
- Integration with Other Platforms: Set up and manage integrations with various review platforms to ensure all reviews are pulled into Fin Suites.
4. Best Practices for Using the Reviews Tab
- Respond Promptly: Responding quickly to both positive and negative reviews shows that you value customer feedback and are committed to customer satisfaction.
- Regularly Monitor Reviews: Check the Reviews tab regularly to stay on top of customer feedback and address any issues before they escalate.
- Encourage Positive Reviews: Use the review request feature to encourage happy customers to leave positive reviews, helping to improve your overall rating.
- Learn from Feedback: Use insights from reviews to identify areas of your business that may need improvement or to recognize what you’re doing well.
5. Practical Example
- Scenario: A customer leaves a 3-star review on Google mentioning slow service.
- Action: You can quickly find this review in the Reviews tab, respond directly to apologize for the inconvenience, and offer to rectify the issue.
- Follow-Up: Send a personalized email or SMS afterward to check in and encourage them to give your business another try.
How to Customize the Review Request Messages (SMS/Email)?
Customizing the review request messages (SMS/Email) allows you to personalize the communication you send to clients or customers, making it more aligned with your brand and messaging strategy. Here's how you can do it:
Step-by-Step Guide to Customize Review Request Messages
1. Access the Reputation Management Settings
Log in to your GoHighLevel account.
From the dashboard, navigate to the Reputation Management section. This is where you can manage reviews, send review requests, and customize the messages.
2. Go to Review Request Settings
Within the Reputation Management area, look for Review Request settings.
Here, you can customize the SMS and email messages that will be sent out to clients asking them to leave a review.
3. Select the Type of Message to Customize
You’ll typically have options to customize both SMS and Email review requests.
Choose whether you want to edit the SMS message, the email message, or both.
4. Customize the SMS Review Request Message
Click on the SMS review request option.
You will see a text editor where you can enter your custom message.
Use placeholders or variables (like , , ) to personalize the message.
For example: Hi , we hope you had a great experience with ! We'd appreciate it if you could leave us a review: . Thank you!
Make sure the message is concise due to the character limits of SMS.
5. Customize the Email Review Request Message
Click on the Email review request option.
A more comprehensive editor will appear, allowing you to format text, add images, and include links.
Draft your email message, using placeholders to personalize the content.
For example: <p>Hi ,</p>
<p>Thank you for choosing ! We value your feedback and would love to hear about your experience. Please click the link below to leave us a review:</p>
<p><a href="">Leave a Review</a></p>
<p>Thank you for your time and support!</p>
<p>Best regards,<br> Team</p>
Customize the subject line and preview the email before saving.
6. Test the Custom Messages
Before rolling out the custom messages to all clients, test them by sending the review request to yourself or a colleague.
This ensures that the placeholders are correctly formatted and the messages appear as expected.
7. Save and Implement
Once you’re satisfied with the customization, save the changes.
These customized messages will now be used whenever you send out review requests through Fin Suites.
8. Automate the Review Request Process (Optional)
If you want to automate the sending of review requests, you can set up workflows in Fin Suites to trigger these messages automatically after certain actions, like the completion of a service or after a set number of days post-interaction.
Tips for Effective Review Request Messages
Keep It Simple: Make sure the message is clear and easy to understand. Directly ask for the review and provide an easy way for the client to leave one.
Personalize: Use placeholders like the customer’s first name or the service they received to make the message feel more personal.
Express Gratitude: Thank the customer for their time and their business.
Provide a Direct Link: Always include a direct link to the review page to make the process as easy as possible for the customer.
Customizing review request messages allows you to maintain a consistent brand voice and increases the likelihood that customers will respond positively to your review requests.
How to Send Review Requests?
In this article, we will cover several ways to send review requests to clients manually and automatically within the CRM. Prompting your clients to provide reviews on your Google My Business Page provides several benefits which we will cover below.
Pre-requisites before getting started with review requests
To send Google reviews links please integrate GMB or a 3rd party review link first.
Review requests will need to be enabled (toggled on) in the sub-accounts settings (Optional)
Customize your outbound (SMS/Email) review messaging
Here are several reasons why you would want to get as many reviews as possible:
If you’re a business owner, then you probably already know that the answer to why your business or service would need reviews is “because it helps people find out more about your business.” And there's more...
1) To increase sales and conversions
If you’re selling a product or service, then it makes sense to have positive reviews from happy customers. They can help convince potential buyers that the product/service will be good for them.
2) To improve SEO
SEO (Search Engine Optimization) is one of the most important aspects of running an online business. Having high-quality content is great, but if your site isn’t optimized for search engines like Google and Bing, then it won’t rank as well in searches.
3) To build trust with visitors
When people visit your website, they want to know that they are dealing with someone who is trustworthy. If you have lots of negative comments on your site, then this could damage your reputation and cause customers to be less likely to buy from you in the future.
4) To provide a better customer experience
If you don’t offer any reviews or ratings for products, then it can make it difficult for potential buyers to find what they need. This will also mean that they may not get the best deal when buying online.
Ways to send Review Requests:
There are three ways to send review requests from within the CRM:
1. Quick Actions - This is a Manual action by the user
2. Workflow Action - This is an Automated action that sends a review request from within a workflow. If the contact has an assigned user the review request will come from the assigned user.
3. Reputation Tab - This is a Manual action by the user
1. Quick Actions: (Manual)
Quick Actions are shortcuts available in the top left above the sidebar which allows you to perform a set of actions with a few clicks. One of those actions is Sending a review Request.
Note: When sending a review request, the person who is signed in will be the one listed as the sender of that message. If you are looking to send a review request from the contact's assigned user, please use the Workflows action "Send Review Request" to send a request on behalf of the assigned user (listed below).
2. Workflow Action: (Automated)
To automate the review request process within a workflow please add the "Send Review Request" action > Select the channel Email/ SMS
3. Reputations Tab: (Manual)
In the sidebar, you can head to the Reputation tab> Requests> To send an individual Review Request Manually and to keep a track of all the review requests that are being sent.
What do the different review request statuses mean?
Queued: When the user creates a review request, the system will attempt to send the request immediately. If there is a queue of other review requests in front of your request, there may be a slight delay before the request goes out.
Another possible reason is that the email/SMS request is set up to send after one day:
Sent: The system has sent the review request.
Delivered: After the system has sent the review request, only Twilio confirms the delivery of the SMS sent. Mailgun will not provide a delivered status.
Failed: When a review request fails to deliver. This can happen for a variety of reasons such as the phone number not being valid.
If you are using another SMTP integration, please make sure to send the review request by logging in with the user email that matches the SMTP integrated email. The system will use the user login email as the sender's email when sending review request emails.
How to Dispute a Google Review?
How to Dispute a Google Review and Check on the Dispute Status?
When you flag a review as inappropriate, Google may take action against the reviewer, such as removing the review or banning the reviewer from leaving future reviews. This is usually only done if the review violates Google’s guidelines, such as posting spam or containing offensive language. If you believe a review is fake or biased, you can report it to Google for further investigation.
Note: You can only dispute a review from within the conversations tab if it was generated by the system. If the review was not generated from the system please start the process by clicking here: https://support.google.com/business/workflow/9945796
Reporting a Google Review from within the Conversation tab
To report a Google review from within the CRM you would need to go to the Conversations tab and search for the contact you want to report the review for and click on Dispute this review:
You will be prompted to confirm your Google email and business account associated with the GMB review in question.
Next, you'll choose whether you'd like to report a review or check the status of a review you've already reported:
If you choose to report a new review to be removed, Google gives you a list of your recent reviews that you can click to view on Google Maps or submit a takedown request:
Checking the status of existing Reviews you have Reported:
To check on the status of a review that you have already reported, click here: https://support.google.com/business/workflow/9945796
If you chose to check the status of a review you previously reported, it will show you those reviews, including their current status.
You can then select that review to see more of a summary and even submit an appeal if your takedown request was not accepted.
Note: There is a limit to the number of reviews Google will show you here. This feature only works for Google My Business accounts that have a small number of listings in them.
Maximizing Customer Engagement with Reviews AI: A Guide to Suggestive and Auto-Pilot Modes
Enhancing your online reputation and building trust with customers is now easier than ever with our Reviews AI feature. Whether you want to make your Google and Facebook review management more efficient or automate your review responses, our feature offers two distinct modes: Suggestive and Auto-Pilot. In this guide, we'll walk you through how to make the most of these modes and explain the pricing structure.
Note:
Reviews AI is follows pay-per-usage pricing and one review AI costs 0.08$ per response.
There are three free trials in the suggestive mode after the first use. Every reviews sent via Auto-response mode will be charged 0.08$/review response.
Getting Started with Reviews AI
Accessing Reviews AI: To get started, log in to your account and navigate to Reputation tab. The Reviews AI feature is available on the Reviews Section.
a) Suggestive Mode: Crafting Authentic Responses
Suggestive Mode helps you compose personalised and genuine review responses. It provides suggestions based on the review content, making it easier to engage with your customers authentically. In suggestive Mode users have to select the AI Reply button, and the Reviews AI will generate unique review responses.
b) Auto-Pilot Mode: Streamlining Your Review Management
Auto-Pilot Mode is designed for efficiency. It allows you to automate the review response process, saving you time while maintaining a professional and personalised touch.
With Auto-Pilot Mode, you have the power to:
Customise automated responses based on star ratings.
Define the wait time before sending each response.
Add a personal touch with review response footers, including thank-you notes or your business name.
Tailor auto responses for specific sources, such as Facebook and Google.
Pricing Structure
Our pricing structure is designed to offer flexibility and affordability:
3 free Responses in suggestive mode: Delight in the capabilities of Reviews AI with your first response being the only chargeable one. After that, enjoy three responses on the house.
Subsequent Responses: Pricing at a Glance: Starting from the 5th response, all additional responses are charged at a competitive rate of 0.08 cents per response.
All Responses via Automated Response Mode: Enjoy the same affordable rate of 0.08 cents per response for all automated responses.
Managing Your Billing: Keep track of your usage and manage your billing conveniently through your account settings.
Best Practices for Reviews AI:
Tailoring Responses to Your Brand: Customise suggested responses to align with your brand's tone and personality.
Monitoring and Customising Auto-Pilot Responses: Regularly review and adjust Auto-Pilot responses to ensure they reflect your brand's values and standards.
Engaging with Customers Beyond Reviews: While Reviews AI can handle responses efficiently, don't forget the importance of deeper customer engagement beyond review replies.
How does re-billing work?
Sub-accounts pay the agency and get invoices. The money is deposited from the sub-account into the agency Stripe account..
Customizing & Displaying the Review Widget
The review widget is a great way to get feedback from your customers. It’s also a good way to show off your product and services with glaring reviews. We will walk through how you can customize and embed the review widget.
What You Need To Know Before Customizing The Review Widget
The review widget can be used on 3rd party platforms by embedding the code provided
You can display your Facebook and Google reviews using the 'Review Widget Element' within funnels and websites
Reviews will show up under the reputation tab
How to customize and embed the review widget on a funnel/website?
Review Widget Customisation in reputation management is not just about making reviews look good; it's about strategically leveraging customer feedback to boost reputation, build trust, and drive conversions. By personalising review widgets to align with brand identity and audience preferences, businesses can harness the full potential of their online reviews and thrive in the digital landscape.
Keeping this in mind, we introduce the new and improved Review Widget customisation feature. This powerful tool allows you to create and tailor review widgets to perfectly match your brand's style, content, and preferences. Whether you're a seasoned user or just getting started, this guide will walk you through the process of creating and customising your review widgets step by step.
1. Accessing the Review Widget Customisation Tool
To get started with customising your review widgets, click on Reputation and navigate to the Widgets tab.
Click the "Create New Widget" button to begin crafting your custom review widget. Alternatively you can also choose from the existing template from the templates tab.
2. Layout Tab: Configuring Widget Structure
In the "Layout" tab, you can define the fundamental structure of your widget:
Select your preferred widget type: List, Masonry, Grid, or Legacy. The Legacy widget type retains the characteristics of our original widget style, primarily for backward compatibility, and offers limited customization options.
Choose the source of your reviews, such as GMB and FB.
Define the maximum number of reviews you wish to showcase.
Select the Maximum Ratings you wish to showcase in the Widget
Toggle the option to enable or disable the "Powered by" section that is displayed at the end of the review widget.
3. Content Tab: Editing Widget Header and Description
In the "Content" tab, you can fine-tune how your widget appears:
Enhance Widget Title and Description: Craft compelling and on-brand widget titles and descriptions. Customise them to effectively communicate your message.
Header Section Customisation: In the header section, you have the option to enable/disable the display of the rating, total review count, and "Write a review" button within the widget.
4. Appearance Tab: Choosing Themes and Colours
The "Appearance" tab gives you control over the visual style of your widget
Choose from Light, Dark, or create a Custom theme.
If you opt for Custom theme, customise individual component colours such as widget heading colour, reviews colour, star rating colour, Background colour, Border colour and more.
5. Settings Tab: Fine-Tuning Widget Behaviour
In the "Settings" tab, you can further refine your widget's behaviour:
Enable or disable review elements like the display of the review date and reviewer icon.
Choose to exclude reviews containing no description.
Generate an embed code for your website. Copy the provided code and paste it into the HTML of your website to display your widget where you want it. Alternatively you can also copy code directly from the copy code icon at the top right of the widget screen
6. Saving, Naming, and Managing Your Widgets
Give your widget a meaningful name for easy reference. You can view all your saved widgets in the saved widgets tab. Choose to save your widget for later use or make it live immediately.
You can also delete widgets you no longer require by clicking on the triple-dot menu at the widget's upper corner.
Integrations
Stripe/Online Listings Integration
Integrating Stripe with Fin Suites allows you to process payments, manage subscriptions, and handle transactions directly from your CRM platform. Here's a detailed guide on how to set up and utilize Stripe integration in Fin Suites.
Guide to Stripe Integration in Fin Suites
1. Connect Stripe to Fin Suites
a) Access the Integrations Page
- Log in to your account.
- Navigate to the Settings tab in the left-hand menu.
- Under Settings, find and click on Integrations.
b) Select Stripe Integration
- On the Integrations page, you’ll see a list of available integrations.
- Find Stripe and click on Connect.
c) Authorize the Connection
- You’ll be redirected to the Stripe login page. Enter your Stripe credentials to log in.
- If you don’t have a Stripe account, you can create one from this page.
- Once logged in, authorize Fin Suites to connect with your Stripe account.
- After authorization, you’ll be redirected back to Fin Suites, where you’ll see that Stripe is now connected.
2. Set Up Payment Options
a) Configure Payment Settings
- After connecting Stripe, go back to the Payments section in Fin Suites settings.
- Configure payment settings, such as currency, tax rates, and default payment options.
b) Create Products/Services
- Navigate to the Payments section.
- Click on Products/Services to create items that you’ll sell through your funnels or website.
- Add the name, description, and price of each product or service.
- Link these products/services to your Stripe account for payment processing.
3. Integrate Stripe with Funnels and Websites
a) Add Payment Forms to Funnels
- Go to the Funnels section and select the funnel where you want to add a payment option.
- Edit the funnel step where the payment will be collected.
- Drag and drop the Order Form element onto the page.
- Customize the order form by selecting the product/service, and ensure the payment method is set to Stripe.
- Save and publish the funnel.
b) Embed Payment Forms on Websites
- Similarly, you can embed payment forms on your website.
- Go to the Websites section, select the page, and use the Order Form element to add a Stripe payment form.
- Customize the form to fit your website design and link it to the desired product/service.
4. Manage Payments and Subscriptions
a) View Transactions
- All payments processed through Stripe in Fin Suites will be visible in the Payments section under Transactions.
- Here, you can view details like payment status, customer information, and transaction history.
b) Manage Subscriptions
- If you offer subscription-based services, you can manage these directly within Fin Suites.
- Go to the Subscriptions section under Payments to view active subscriptions, upcoming invoices, and customer details.
c) Refunds and Cancellations
- To issue refunds or cancel subscriptions, navigate to the specific transaction or subscription in the Payments section.
- You can process refunds directly through Fin Suites, which will be reflected in your Stripe account.
5. Automate Payment Processes
a) Set Up Workflows
- Use Fin Suites’s workflow automation to trigger actions based on payment events.
- For example, you can set up a workflow to send a confirmation email once a payment is completed or to notify your team when a subscription is canceled.
b) Use Triggers for Payment Reminders
- Create triggers to send automatic reminders for upcoming payments or failed transactions.
6. Reporting and Analytics
a) Payment Reports
- In the Payments section, Fin Suites provides detailed reports on your transactions, revenue, and subscription metrics.
- You can filter these reports by date, product, or customer to gain insights into your business performance.
b) Stripe Dashboard
- For more advanced analytics and reporting, you can always log in to your Stripe dashboard, where you’ll find comprehensive financial data, including payouts, fees, and more detailed transaction history.
Benefits of Integrating Stripe
- Seamless Payment Processing: Easily accept payments directly from your funnels, websites, and forms.
- Subscription Management: Handle recurring payments and subscriptions with ease, automating billing and customer management.
- Automation: Leverage Fin Suites’s workflow and automation tools to streamline payment-related processes.
- Detailed Reporting: Access in-depth reports to monitor your financial performance and customer payments.
Best Practices
- Test Your Payment Forms: Before going live, always test your payment forms to ensure they work correctly and provide a seamless customer experience.
- Regularly Monitor Transactions: Keep an eye on your transaction history and reports to identify any issues or trends.
- Stay Compliant: Ensure your payment processes comply with local regulations and Stripe’s terms of service, especially concerning data security and customer privacy.
Google Integration
How to Set Up Two Way Email Sync for Gmail
Two-way sync for Gmail allows users to integrate their Gmail account with the CRM and enables the synchronization of emails between the two platforms. This integration creates a connection between the platforms and syncs both ways.
Sync inbound and outbound emails from existing contacts to Fin Suites
Create contacts and add conversations seamlessly from Gmail
Real-time bidirectional email synchronization for improved efficiency.
What is Gmail Two way sync?
Gmail Two-Way Sync is a feature that enables the bidirectional synchronization of emails between Gmail and CRM. It allows users to integrate their Gmail account with the CRM, establishing a connection that keeps emails in sync across both systems. Any emails sent, received, or updated in Gmail will be automatically reflected in the CRM, and vice versa. The two-way sync ensures that users have a unified and up-to-date view of their emails, regardless of their platform. This feature streamlines email campaigns improves productivity, and ensures that important email communications are accessible in both Gmail and the CRM.
Steps to connect
In the sub-account, go to "Settings" > "My Profile" and then the General tab. Scroll down to the section Email (2-way sync)
Please Note:You will only see the Profile tab if you are added to the sub account for which you are viewing at that time. You can also use the Login As Feature to login as a user of that sub account to access the Profile tab.
Over there, please select Gmail two sync and hit Connect.
It will then prompt you to choose one of the available Gmail Accounts in that browser or ask you to connect a Gmail account; select the one you need; connecting a new account will require you to enter that account's credentials in the popup.
Connecting it will then ask you about which permissions you are allowing LeadConnector to have on your Gmail account; make sure to allow all and then hit enable continue:
Once you hit, Continue, you will see your desired Gmail account connected in the Email Two Way sync tab
How does the 2-way sync work between the CRM and your email account?
There are two cases of how the sync can be established.
1. You can email a contact from the CRM to initiate the sync between both platforms.
2. Gmail Sync also works if a contact that is already saved in the CRM sends an email to the User (who has Gmail Two Way sync integrated) on their Gmail Email address. The email would sync into the conversations tab. The contact also needs to be assigned to the user beforehand.
Please note: If the user is added to multiple sub accounts, and has integrated the same Gmail account for Gmail Two way sync in all those accounts, the email from the contact will go to the conversations tab of all those sub accounts, but we will only retain the instance of that contact in that sub account to which the user replies to. Sync will be broken for all other instances. The additional filter of user being assigned to the existing contact also makes sure that the conversation will not go to sub accounts that the contact does not belong to.
The sent email will show up in the sent inbox of the integrated Gmail account
Please Note: Gmail supports only ~500 emails per day and emails beyond that will be unsuccessful.
All subsequent messages in the email thread will be in sync. Outbound emails from your email will reflect in the CRM and vice versa.
Please Note: The supported attachment size limit for Gmail Two way sync is 25 MB.
Other functionalities
Update Email: This helps users change their connected email ID to another without disconnecting the previous connection. New outbound emails from the CRM will start syncing with the newly added email address. Upcoming messages in the previously connected email ID (same thread) will stop syncing between the CRM & personal email.
Disconnect Email: This helps users to disconnect their connection and stop the sync with the CRM. Post disconnect, emails or messages will not sync between both platforms.
BCC Address: You can include the BCC Address in the Cc or Bcc field when sending an email from Gmail/Outlook. Doing so will automatically add the contact and conversation to your CRM, streamlining communication and ensuring all relevant data is centralized. Going forward, any emails received from this contact at the Gmail/Outlook inbox level will automatically sync with CRM.
Please Note: You may receive a "Delivery incomplete" error from Gmail when using BCC addresses. This occurs because we use BCC for logging purposes, and Gmail doesn't get a delivery receipt for BCC addresses. Despite the error, your message might still be successfully posted to the CRM.
Does Two-way sync only work with individual emails or bulk emails and workflows?
How the sender domain mapping works for different types of emails:
Individual Email: On connecting a personal email account (Gmail), the Gmail email ID will be considered the sender domain for the emails the user sends for individual emails. Individual emails are sent directly from Gmail when 2-way sync is activated for the user. Be aware that Google sets a limit of 500 emails daily, which applies to this functionality.
Bulk Email: This will continue to be sent from the sub-account level email provider. 2-way sync won't affect this.
Workflow & Automation: In terms of automated emails, they are not sent from the 2-way sync but dispatched from the defined sub-account level providers. This arrangement seamlessly integrates your automated CRM workflows and the email dispatch system.
Please Note: With this setup, users can leverage the 2-way sync for their one-on-one emails while also successfully sending bulk emails. The Gmail-imposed limit of 500 emails per day applies only to individual emails, so users can send bulk emails via LeadConnector/SMTP without worrying about reaching this limit. This is a thoughtful design feature, allowing users to conduct mass email campaigns without being constrained by Gmail's daily email cap.
What happens to emails received from existing contacts?
All inbound emails from existing contacts will be reflected in your CRM and Gmail/Outlook inbox. This bidirectional synchronization ensures that you have a complete record of all your communication on both platforms.
Will removing a synced account delete existing emails?
No, removing a synced account will not delete any existing emails. Your previously synced emails will remain intact, and the synchronization will only affect new emails sent or received after the account is removed.
Do new emails get synced after an account is removed?
New emails sent or received after removing the account will not be synced between the CRM and Gmail/Outlook. The synchronization between the two platforms will continue for existing emails, and new emails will not be included in the sync.
Will all my existing contacts in Gmail be synced with the CRM?
Yes, the Two-Way Sync identifies and syncs existing contacts from Gmail to the CRM. Incoming emails from these contacts are automatically populated under the respective contact, but past emails (prior to the integration being connected) cannot be synced over.
What happens when a new email is received from a contact?
New incoming emails from existing contacts will be reflected as new emails in the CRM and Gmail. If the email belongs to an existing conversation thread, it will be displayed as a new email within the same thread.
What happens to sent emails from the CRM or Gmail?
Outgoing emails sent from the CRM will be auto-logged in the Sent folder of the synced mail. Conversely, emails from the synced mail provider will automatically appear under the corresponding CRM contact's conversations.
How are cc/bcc recipients handled in the sync?
If a user is cc'ed or bcc'ed, or included in multiple recipients in Gmail, this information is reflected under the respective contact in the CRM, ensuring comprehensive visibility of all communications. No new contacts are created for the CC and BCC email address.
What if a contact emails someone else but includes the CRM user?
In this case, the email will be reflected under the CRM, associating it with the respective contact, maintaining the complete conversation history.
How is the conversation thread managed when multiple recipients are involved?
In case of multiple recipients (to) in an email, the first contact becomes the conversation tab in the CRM. All subsequent emails will appear in this thread.
What if the same contact exists in multiple locations for the same synced email address?
Email originating from the CRM will be reflected only in the respective location. Subsequent replies and communication should also be specific to that location. However, emails from a contact to the CRM user should be reflected in all locations.
What is BCC Address, and how does it work?
You can include the BCC Address in the Cc or Bcc field when sending an email from Gmail/Outlook. This automatically adds the conversation and contact in the CRM, streamlining communication and data management.
Going forward, any emails received from this contact at the Gmail/Outlook inbox level will automatically sync with CRM.
How is the secure connection handled if Gmail login credentials change?
In case of changed login credentials, the CRM will require you to reauthenticate and resync the email to maintain a secure connection.
What happens when an email is forwarded from Gmail?
Any forwarded email to an existing contact will be treated as a sent email and synced under that contact in the CRM.
What if there are duplicate emails with multiple contacts?
Duplicate emails sent to multiple contacts will be associated with the first created contact in the CRM.
Outlook Integration
Two Way Email Sync for Outlook
Email Two Way Sync is a feature that allows the synchronization of emails between the CRM and an email client, in both directions. Any email sent, received, or updated in one platform is automatically synced with the other, ensuring that all relevant data is available in both places. Using 2-Way Sync for Outlook, Users can link their Outlook account with the CRM and sync emails to and from both platforms.
How to Connect Outlook Two Way Email sync?
In a sub-account, go to "Settings" > "My Profile" tab and scroll down to the section "Email (2-way sync)"
Select Outlook, your email provider & click on Connect.
Complete the authorization by entering your Outlook email ID credentials.
Approve for permissions requested for LeadConnector.
In "Settings" > "My Profile" scroll down to the section "Email (2-way sync)" to view your email in the connection status.
How does the 2-way sync work between the CRM and your email account?
Once the 2-way sync is connected (Gmail or Outlook):
When you initiate an email from the CRM, the email thread and its subsequent messages will be in sync between both platforms (CRM & Outlook).
If you receive a new email in your inbox (Outlook) from an existing contact in the CRM, the email will automatically sync into the CRM along with the subsequent messages in the thread.
If you are sending a new email from your inbox to a contact that doesn’t exist in the CRM and you would like the email to be in sync with the CRM, use the BCC address in the Cc or Bcc field in your composer and send the email. By doing so, a new contact will be created in the CRM, and the email will be in sync between both platforms.
Note:
We don’t sync emails from contacts who also happen to be sub-account users. Often, sub-account users are added as contacts for various purposes. We don’t sync such emails as they may contain confidential information. If the email address doesn’t belong to an internal user, emails will sync as mentioned above.
Please ensure you have enabled ‘Outlook 2-way Sync’ in Labs to make sure that the above-mentioned points work seamlessly. If the LABS is turned off, only the emails initiated from CRM will sync and Auto BCC will not sync the contact.
All subsequent messages in the email thread (initiated from the CRM) will be in sync. Outboundemails sent from your email will start reflecting in the CRM and vice versa.
Please note: Attachments of up to 3 MB size work across this sync, any attachments larger than this size will cause the message to not sync over. Supported file types: JPG,JPEG,PNG,MP4,MPEG,ZIP,RAR,PDF,DOC,DOCX,TXT
Other functionalities
Update Email: This helps users change their connected email ID to another one without disconnecting the previous connection.
New outbound emails from the CRM will start syncing with the newly added email address. Upcoming messages in the previously connected email ID (same thread) will stop syncing between the CRM & personal email.
Disconnect Email: This will disconnect their connection and stop the sync with the CRM. Once disconnected, emails or messages will not sync between both platforms.
Does Two-way sync only work with individual emails or bulk emails and workflows?
How the sender domain mapping works for different types of emails:
Individual Email: On connecting a personal email account (Outlook), the outlook email ID will be considered as the sender domain for the emails sent by the user for individual emails.
Bulk Email: If the user enters their email ID (after setting up the two-way sync) under the “From Field,” the user email ID will be considered the sender domain for the bulk emails. If the field is blank, the sub-account level provider will be considered the sender domain.
Bulk Email: If the user enters an email ID different from their email ID connected (Outlook), it will consider the sub-account level provider as the sender domain.
Workflow & Automation: Emails will continue to go from sub-account level providers. These will not be in sync with your inbox.
Zapier Integration
How to connect your Fin Suites Sub-Account with Zapier?
Are you using Fin Suites for your business and looking to streamline your workflow further? Have you considered integrating it with Zapier?
Zapier is a platform that allows different apps to communicate instantaneously to automate workflows. By integrating Fin Suites with Zapier, you can automate tasks such as lead capture, updating contacts, and much more.
Connecting your Fin Suites Sub-Account with Zapier allows you to automate workflows and integrate Fin Suites with a wide range of apps and services. This connection enables you to create automated tasks, manage data, and streamline processes across different platforms.
Connecting Fin Suites Sub-Account with Zapier:
1. Set up your Fin Suites Account
Log In to Fin Suites
Navigate to API Settings:
- Go to the Settings tab from the left-hand menu.
- Click on API Settings.
Generate API Key:
- In the API Settings section, click on Generate New API Key.
- Copy the API Key as you will need it for connecting to Zapier.
2. Create a Zapier Account (If You Don’t Have One)
3. Connect Fin Suites to Zapier
Create a New Zap:
- Once logged into Zapier, click on Make a Zap.
Set Up the Trigger App:
- In the Trigger section, search for “Fin Suites” in the app search bar.
- Select Fin Suites as the trigger app.
Choose Trigger Event:
- Choose the trigger event you want to use. Common options might include “New Contact,” “New Opportunity,” or “New Form Submission.”
- Click Continue.
Connect Your Fin Suites Account:
- Enter the API Key you copied earlier when prompted.
- Click Continue after the connection is established.
Set Up Trigger:
- Configure the specific details for the trigger event (e.g., selecting which pipeline or form you want to monitor).
- Click Continue and test the trigger to make sure it works correctly.
4. Set Up the Action App
Choose an Action App:
- After setting up the trigger, search for and select the action app you want to use (e.g., Gmail, Slack, Google Sheets).
- Choose the specific action event you want to perform (e.g., send an email, create a row in a spreadsheet).
Connect the Action App:
- Connect the action app to Zapier by following the prompts to log in and authorize access.
- Configure the details of the action (e.g., mapping fields from Fin Suites to the action app).
Test the Action:
- Test the action to ensure that it performs as expected with the data from the Fin Suites trigger.
5. Turn on Your Zap
Review and Finalize:
- Review your Zap setup to ensure that everything is configured correctly.
- Click Turn on Zap to activate the workflow.
Monitor and Adjust:
- Monitor the performance of your Zap to ensure it runs smoothly.
- Adjust settings or add additional steps as needed.
Common Use Cases for Fin Suites and Zapier Integration
- CRM Integration: Automatically create new contacts in Fin Suites when a form is submitted on your website or another platform.
- Lead Management: Send notifications to your team or create tasks when a new lead enters a specific stage in GoHighLevel.
- Data Syncing: Sync GoHighLevel data with other tools like Google Sheets, CRMs, or email marketing platforms.
Troubleshooting Tips
- API Key Issues: Ensure you have copied the correct API Key from Fin Suites and that it has the necessary permissions.
- Zapier Errors: If you encounter errors, check the Zapier task history and review the setup steps to ensure all configurations are correct.
- Connection Problems: Verify that your Fin Suites account and the action app are correctly linked and authorized in Zapier.
How to set up Facebook Conversions API Lead Event?
Facebook Conversion Leads Walkthrough
Facebook Conversions API aims to connect your marketing data directly with Funnels and Workflows in LeadConnector and Facebook Meta that help optimize ad targeting, decrease cost per result, and measure outcomes. With Facebook Conversion API, you can collect the people who are more likely relevant audiences for running your ads for retargeting. It is a setup for your business to upload server events for your web traffic.
What is the difference between Funnel Events and Lead Events in Facebook Conversion API?
In LeadConnector, we support two types of Facebook Conversion API.
Funnel Events - The events are sent from a web server to record the events when the user visits the page, adds products to a cart, purchase, subscribe, submit an application, and more. To learn more about how to set up Funnel Event Pixel using FB CAPI, please read this article.
Lead Events - The LeadConnector CRM sends the events with how the Lead moves across the pipeline stages. For example, a Business creates a pipeline name Lead Generation. The leads are moving across the pipeline stages, from new leads to booked or abandoned ones. With Lead events, LeadConnector CRM sends the data to Facebook Conversion API - with CRM being the data source.
Conversion Leads - Facebook conversion leads integration helps your Facebook lead ads Instant Forms optimize for the quality of leads instead of the volume of leads. When users submit the Instant form, their contact information is captured and synced in Highlevel's CRM. This contact information can then be used to follow up with the leads to nurture them and move them further down the sales funnel. As each Lead moves through the sales funnel, the Conversion leads integration allows the advertiser to share the lead status with Meta, which allows Meta to optimize the lead ad for increased lead-to-sales Conversion. will enable
Guidelines to ensure your business is a good fit for the Conversion Leads integration:
Use Facebook/Instagram Lead Ads (Instant Forms) [Facebook form field mapping inside LeadConnector is used]
Ensure the 15-16 digit Meta Lead ID is mapped to your CRM
Generate at least 250 leads per month
Can upload data regularly at least once per day
The lead stage you want to optimize for occurs within 28 days of leads being generated
The lead stage you want to optimize for has a 1% - 40% conversion rate.
How to set up FB CAPI (Conversions API) Lead Event?
Step 1: Create an FB Pixel:
Please start creating a pixel by going to your Facebook Business Manager (also called the Meta Business Suite) > Head over to the left and then the Events Manager tab.
Ensure you are connected to the correct Ad Account with all the required Access to that FB Page.
Head over to the left sidebar and then click on Connect Data Sources
Choose CRM in the options that show up, and then hit Connect.
Please Note: If you are looking to send a Funnel Event using Facebook CAPI from LeadConnector for funnel events, select the web option here for recording the events.
It will show you a popup with Best Practices and a button to click Next. The Best Practices are Facebook suggestions on how to utilize this capability best. Click on Next to proceed.
Click on Create New Pixel or Use an existing pixel from the list for collecting the data. Click Continue when the pixel details are added. It will take you to your FB Events Manager> Data Sources> Settings. Hit Continue in front of Choose Your CRM
Search for LeadConnector in the search bar, and choose LeadConnector from the dropdown:
Select Use a third-party partner to connect in a few steps (no coding required), then choose LeadConnector. Then click on Go to Partner to proceed. It will ask you to grant LeadConnector permission to connect with your Facebook Conversions API, and then your CRM should be connected.
Please Note:
Prerequisite for Facebook CAPI - Lead Events
1. In CRM, please go to Settings > Integration > Check the Facebook account is connected with admin permissions. Please ensure that your FB Business Page, which you are an admin of and have all access to, is integrated and the correct FB lead Form is mapped in your CRM account.
2. In Facebook From Field Mapping, the form should be mapped correctly and the status should be enabled. Facebook form mapping has moved under location settings > integrations > Facebook Form Field Mapping. Here is a list of the supported custom fields which include multiple and single option custom fields as well.
Supported custom fields when using Facebook Lead Ads:
TEXT
LARGE_TEXT
NUMERICAL
PHONEMONETARY
SINGLE_OPTIONS
DATE
DROPDOWN
RADIO
OPTIONS
CHECKBOX
Step 2: Create two FB Conversions API Workflows.
Please Note: You need to create Two Workflows for this process to work effectively.
The first workflow focuses on generating leads and adding them to the correct pipeline with an Create/Update Opportunity Action. Once a lead is captured, it is important to ensure that it is properly tagged and categorized in the correct Pipeline and Stage so that it can be effectively managed and tracked as it moves through your sales funnel.
The second workflow focuses on triggering events for Facebook conversion leads. The goal of this workflow is to get fired off by a lead being moved to a specific pipeline stage and then a Facebook Conversions API workflow action pushing them to FB CAPI.
By combining these two workflows, you can create a comprehensive lead generation and management system that is optimized for Facebook conversion leads. This can help you generate more qualified leads, convert more customers, and grow your business over time.
1) To send a CRM event from your CRM, you need to create a workflow that does that. For now, you can navigate away from the FB Events Manager> Data Sources> Settings (but keep it open in a tab in your browser) and head over to your CRM account.
Workflow -1 to Create/Update Opportunity
Once the FB page is integrated correctly in sub-account settings, go to your Automations> Workflows >Create a new Workflow.
Add a new Workflow Trigger in your Workflow and have it get fired off by Facebook Lead Form Submitted (if that is the first stage of your conversions flow). You can add filters to choose which specific Facebook Lead Ad form to get the Workflow to be triggered by submissions to that form only.
After this, add another trigger for "Facebook Conversion Api". Add the required details for Access Token, Pixel ID and Stage Name, and then add the action for Create or Update Opportunity. Specify the Pipeline and Pipeline Stage for this action. The pipeline should be the one you will move the Lead to, which is being checked by the Conversion API for the required Lead Events.
The Opportunity Name can be defaulted to the Lead's Full Name by using the custom value dropper. Toggle on Allow Duplicate Opportunities for this particular Workflow.
2) IMPORTANT Note - In Workflow Settings, please Allow Multiple contacts.
3) Make sure to save your actions and then save and Publish the Workflow.
Workflow -2 to send Conversion data to FB Conversion API
Create another workflow. Add the Pipeline Stage Change trigger and a Facebook Conversion API action.
Choose Lead Event as the Event Type. Make sure to save your actions and then save and Publish the Workflow.
4) Navigate to your Facebook Events Manager> Data Sources> Settings> Scroll down and click on Generate Access Token. Copy the generated Access Token.
5) Paste it in the Access Token field of your Workflow's FB Conversion API Action.
6) Navigate to your Facebook Events Manager> Data Sources> Settings> Scroll down and copy your Pixel ID.
7) Paste the Pixel ID in the Pixel ID field in your Workflow's FB Conversion API Action.
8) Fill in the Stage Name; it should accurately represent your Pipeline and Pipeline Stage name for better reporting. Select it using the tag icon at the end to add the custom value of the opportunity pipeline and stages. Save the Action, save and Publish the Workflow. Save the Action, Save and Publish the Workflow.
9) IMPORTANT Note - In Workflow Settings, please enable Allow Multiple.
10) You can test your Workflow using the Lead Ads Test Tool. Choose the correct Page and Lead Ad Form, then Create a Lead.
The Event should be picked up by your Events Manager, who is actively waiting for Events sent by your Workflow. It takes up to a day to successfully pick up an event sent by your Workflow.
Once the Event is sent from the Lead Ads Test Tool, please go to Opportunity Pipeline and move the dummy Facebook lead to another stage configured in the Workflow. Once this is completed, check the workflow status as executed and the conversion API event in Event Manager.
11. Return to the “settings” tab in Events Manager to track the progress of the Conversion Leads integration.
Facebook Lead Ad Integration & Troubleshooting Guide
The Facebook Lead Ads integration allows you to collect leads directly from Facebook Ads and have them automatically synced with your CRM. With this integration, you can easily capture contact information from potential customers interested in your products or services on Facebook and quickly follow up with them through your CRM. By automating the lead capture process, you can save time and improve the efficiency of your sales and marketing efforts.
What is the Facebook Lead Ads Integration?
The Facebook Lead Ads integration with a CRM (Customer Relationship Management) system allows businesses to capture and automatically import leads generated through Facebook Ads into their CRM system. This integration enables businesses to streamline their lead capture process, avoid manual data entry errors, and follow up with leads more efficiently. By integrating Facebook Lead Ads with a CRM, businesses can track and manage their leads through a single platform, which can improve Lead quality, increase conversions, and ultimately help grow their business.
Who is this integration helpful for?
The Facebook Lead Ads integration with a CRM can be beneficial for any business or organization that is using Facebook Ads to generate leads and wants to streamline their lead capture process. It can benefit small businesses or startups that may not have a large sales or marketing team to collect and manage leads manually. By automating the lead capture process, businesses can save time and resources while improving their lead data's accuracy and quality. Additionally, the integration can benefit businesses already using a CRM by seamlessly integrating their Facebook lead data into their existing workflows and follow-up processes.
What are the benefits of this integration?
The benefits of integrating Facebook Lead Ads with the CRM include:
Automated lead capture: With this integration, businesses can automatically capture leads generated through Facebook Ads and import them into their CRM system, eliminating the need for manual data entry.
Improved Lead Quality: By tracking and managing leads through CRM, businesses can better understand their audience, personalize their marketing efforts, and improve the overall quality of their leads.
Enhanced lead management: The CRM system allows businesses to track and manage their leads in one place, providing a 360-degree view of their interactions with prospects and customers. This can help companies to streamline their sales and marketing efforts and improve customer retention.
Efficient follow-up: With lead data automatically captured and imported into the CRM system, businesses can quickly follow up with leads and prioritize their sales efforts based on lead quality and behavior.Increased conversions: Businesses can increase their conversions and ROI from Facebook Ads by automating lead capture and improving lead management.
Pre-requisites for Facebook Lead AdsAccess:
You must have access to the Facebook page for which you're creating lead ads. Refer to this Facebook Help article on how to give someone a role on your Page.
Ownership: Ensure the same user owns the page and the ad account. For business-level integrations, the owner of the page and the ad account must be the same—more on this in the Facebook help section on Ad account roles.
Permissions: Verify that you have the page and ad account permissions. You should ideally have admin or manage permissions. To understand different levels of permissions, refer to Facebook Pages roles and Ads permissions. The user trying to integrate the Facebook Page into the CRM will need to be an admin of the Facebook Business page and have Lead Access Permission to access Lead data (A requirement set by Facebook).
Ad Account Check: Confirm your page is connected to the appropriate ad account. To do this, navigate to the Ad Account settings and verify the connected page—more on how to navigate your ad account settings.
Visibility: Note that only individuals with relevant permissions can see the owners of ad accounts. For details, check Facebook's guide on user permissions for ad accounts.
Leads Access: Check if you have lead access. If the lead connector isn't showing, you may need to manually search for it or enable it. For issues related to leads not syncing, refer to Facebook's troubleshooting guide for lead ads.
LeadConnector will need access to the Facebook Business Manager and Business Page from which you run the Facebook Lead Ad.
If you have moved your page to the New Pages Experience, You can allow trusted people to manage some of your Facebook business pages. You can give some people access to certain parts of your Facebook page without giving them full access.
Open business manager > Left navigation > Users > People. If you have added the person, who will be integrating the FB page to the CRM, there already: they will appear at the center of the page.
Click on the name and see more details, like the role. The role needs to have Admin or Employee access.
If you have not added them, Please follow the steps to add people/users first.
Remember that this business manager role differs from Page Role; the Page Role must still be the Admin.
Please Note:The new Pages experience isn't available for all Pages yet. Some Pages you manage might still use the classic Pages experience. Learn more about classic Pages.
When creating the custom fields for the Lead Ad in the CRM, please make sure to use the supported custom fields listed below:
Supported custom fields when using Facebook Lead Ads:
TEXT
LARGE_TEXT
NUMERICAL
PHONE
MONETARY
SINGLE_OPTIONS
DATE
DROPDOWN
RADIO
OPTIONS
CHECKBOX
How to directly integrate Facebook Leads Ads with a Sub-Account
Please Note: Only the User that integrated the FB page will be able to see that page in the dropdown of pages. They need to be the admin of that FB page to see it in the dropdown of pages and will no longer see other accounts' FB Pages in the list.
Facebook form mapping has moved under location settings > integrations > Facebook Form Field Mapping.
Troubleshooting
Why are my Lead Ads not making it into my Sub-Account?
Are you an admin of the Facebook page - How to add an admin to my Business Manager
Can you confirm that the correct FB Lead Ad form is selected in your Facebook ads manager and matches the one in your Sub-Account? - https://web.facebook.com/business/tools/ads-manager
Now in your Sub-Account, check in settings> integrations > Facebook form fields mapping if there is a blue tick mark next to the form you have selected in ads manager.
If you are, in fact, the FB Admin, can you try this to confirm if Lead Connector is accessible and can allow access to your page?
Link mentioned - https://www.facebook.com/settings?tab=business_tools&ref=settings6.
Once you have completed the steps in the video above, please use the Facebook leads ads testing tool to see if leads are now being added to your Sub-Account.
Lead Ad Testing Tool: https://developers.facebook.com/tools/lead-ads-testingFacebook
Page Select: https://app.gohighlevel.com/location/YOUR_LOCATION_ID/facebook_page_select
Please Note:
When testing are you able to locate the App ID 39018126477806? (Mentioned in the video above @2:49 seconds)
If the app ID does not show up, then LeadConnector does not have access. If that is the case please continue to step 7 below.
If Facebook Lead Ads are not coming into the CRM Please try using unique contact info.
If you see that LeadConnector access to your page has been revoked or the App ID is not coming up, you will manually need to assign Lead access permissions to LeadConnector on Facebook:
i. Go to Business Suite.
ii. If you don't have access to Business Suite, go to Business Settings and select your business, skip to step (v)
iii. Click the dropdown in the top-left corner and choose your business account.
iv. Click Settings in the bottom-left corner.
v. Click More Business Settings.
vi. Click Integrations in the left menu, then click Leads Access.
vii. Click Assign CRMs. You'll see a list of CRM systems integrated with your Facebook Page.
viii. Check the circle next to LeadConnector, then click Assign.
Please Note: The Page Admin who granted permissions to LeadConnector must continue to have access permission or else LeadConnector will fail to fetch data.
A Facebook Token Has Expired In a Sub-Account; why does this happen, and How to Fix This?
If you received an email with a subject that says "Important: Facebook connection has expired.", this means that the Facebook integration for one of your Sub-accounts has become disconnected.
Why Did This Connection Break?
Several reasons could cause the integration to break. The most common are:
A user changes their password
The Facebook token naturally expires after some time
A user de-authorizes your app
A user logs out of Facebook
A user changes page permission or adds/removes a user
A virtual assistant in another country logs in without using a VPN
To reconnect:
1. Select the account indicated in the email you received from the "Switch To An Account" dropdown
2. In the left-hand sidebar, click "Settings."
3. From the sidebar, click "Integrations."
4. Click the "Connected" button to disconnect the broken integration under the Facebook icon. Click on Connect again to reconnect
5. In the window that pops up, continue as yourself, select the Facebook page that you want to connect, then click the "Connect Page" button
Common Errors
Page Quality Issue :
Suppose our user is facing this issue. Our customer needs to raise a support ticket with Facebook Support.
Steps to resolve:
Users need to switch to the Facebook page on Facebook, Go to this link and raise a support ticket with Facebook if there is an issue.
FB Support Doc:
Permission Issue: The easiest way to find the issues is by trying to fetch the latest FB/Insta message and the latest lead.This is how Zapier does it, and it helps us easily find the missed permission. FB API will present an error if permission is missing or for other reasons.
Troubleshooting steps are as follows:
Go to this link.
And then this link
Check if all the permission are enabled for all pages.
Instagram Connection/messages Check:
Check Instagram page is connected to the FB page
Switch your logged-in user to the desired Fb page and go to this link.
Check if messaging is enabled.
If the page is connected, but your IG page is still not visible as an option in your CRM.
Please do a hard reset and then attempt to connect.
Messenger/ Instagram not syncing all messages:
Sometimes the reason for this issue is our LeadConnector app is not set as the primary receiver if they have multiple CRM integration.
Steps to resolve: Switch to the desired FB page and go to this link
Leads, not syncing Issue: We need to check the business side for the places below.
User Added to business(EMPLOYEE OR ADMIN) FB Page Admin:
Ad Account Check: Page Owner should Match with Ad Account Owner
Integration Lead Access Check:If you are still not receiving the leads. Click on Restore Default Access it and check it again.
How to connect Instagram Account to the FB page or verify it is connected:
An Instagram account can be connected to a single FB page.
Steps to connect the Instagram page or verify it is connected to the correct FB page
Log in to Facebook and click Pages in the left menu. Select your Facebook page(Switch to the FB page), then click Settings
Select Linked Accounts in the left column.
Select Instagram, then connect your account.
If it is already connected, we can verify this.
Pages Missing
If an admin of a page also has their business account associated with the same page, they won’t be able to see the page while integrating with Fin Suites. The best workaround is to add a second admin to that Facebook page, and have them integrate.
Steps to add an admin to the page:
Log in to Facebook and click on your profile photo in the top right corner.
Select “See all profiles” and choose the Page you want to grant access to.
Click the profile picture of your Page in the top right to navigate to your Page.
Click “Manage,” then select “Page access” on the left under “Your tools.”
Next to “People with Facebook access,” click “Add New.
”Click “Next,” and then enter the name or email address of the person you want to grant Facebook access to. Finally, click on their name.
You can now choose to grant either partial or full control over the Page:
For partial control, scroll down and click “Give Access.”
For full control, scroll down, click to grant full control, and then click “Give Access.”
Type in your Facebook password to confirm the action, then click “Confirm.”
The person you’ve granted access to will receive an email invitation to accept your invitation to access the Page.
By following these steps, we’ll successfully grant admin access to the user who will be connecting the Facebook account from Fin Suites. This will allow them to manage the Page in the new Pages experience. After granting the admin access to the user, they would be able to successfully add the Facebook page to Fin Suites. This is temporary, we are working with Meta to get this fixed, reported here https://developers.facebook.com/community/threads/712197940934624/
Facebook Conversions API Trigger in Workflows
With Workflows, you can add Facebook Conversion event actions in automation to send conversion data back to Facebook without anyone being cookied by a Facebook pixel!
The Facebook Conversions API (CAPI) Trigger in Fin Suites workflows allows you to track events and conversions directly from your Fin Suites account to Facebook. This integration ensures that you capture user actions and conversions more reliably, especially when browser-based tracking (like the Facebook Pixel) is less effective due to ad blockers or cookie restrictions.
Setting Up Facebook Conversions API Trigger in Fin Suites Workflows
1. Connect Your Facebook Account
Before setting up the trigger, you need to ensure that your Facebook account is connected to Fin Suites.
Navigate to Settings:
- Go to the Settings section from the left-hand menu.
Select Integrations:
- Find and select Facebook under Integrations.
- Follow the prompts to log in and connect your Facebook account to Fin Suites.
2. Create a New Workflow
Next, create a workflow where you want to use the Facebook Conversions API trigger.
Go to Workflows:
- From the Fin Suites dashboard, click on Automation > Workflows.
Create New Workflow:
- Click on Create Workflow.
- Choose a template or start from scratch.
3. Add a Trigger for Facebook Conversions API
Add New Trigger:
- Click on Add New Trigger to start setting up the workflow trigger.
Choose Facebook Conversions API:
- In the trigger options, search for and select Facebook Conversions API.
- This trigger will allow you to send specific events directly to Facebook.
4. Configure the Facebook Conversions API Trigger
Select Event Type:
- Choose the type of event you want to send to Facebook (e.g., Lead, Purchase, Add to Cart).
- These events correspond to actions that you want to track on your Facebook Ads account.
Map Data Fields:
- Map the relevant data fields from Fin Suites to the Facebook event parameters. For example:
- Email: To identify the user (ensure you have user consent for data sharing).
- Phone Number: If applicable, map the phone number.
- Event Value: For purchases or other value-based actions, map the amount or value associated with the event.
Set Event Parameters:
- Configure any additional parameters that Facebook might need, such as currency, content type, or event source.
Add Custom Data (Optional):
- If necessary, you can add custom data or parameters to further refine your tracking and reporting.
5. Finalize and Test the Workflow
Add Actions:
- After setting up the Facebook Conversions API trigger, you can add additional actions in your workflow (e.g., sending a confirmation email, notifying your team).
Test the Workflow:
- Run a test to ensure that the Facebook event is correctly sent and received. You can check this by reviewing the Facebook Events Manager.
Activate the Workflow:
- Once everything is configured and tested, activate the workflow by turning it on.
Best Practices
- Ensure Compliance: Make sure you have the necessary user consent before sharing personal data with Facebook.
- Data Matching: Facebook uses advanced matching techniques, so ensure that fields like email and phone number are correctly mapped to optimize event tracking.
- Regularly Monitor Events: Use Facebook Events Manager to monitor incoming events and ensure they are being tracked accurately.
Use Cases for Facebook Conversions API Trigger
- Lead Generation: Track when a lead form is submitted on your website and send the event to Facebook for better ad optimization.
- E-commerce: Track purchases, cart additions, and other shopping behaviors directly from Fin Suites to Facebook.
- Custom Events: Track specific user behaviors, such as booking a call or completing a survey, and send these as custom events to Facebook.
By setting up the Facebook Conversions API Trigger in Fin Suites workflows, you can enhance your Facebook ad tracking and optimization, ensuring that all relevant user actions are captured and reported, even when browser-based tracking falls short.
"Which initial Workflow Triggers can I use the FB Conversions event with?"
The Facebook Conversions API trigger event works with the following initial Workflow Triggers: Form Submitted, Survey Submitted, Customer Booked Appointment, and Order Form Submission.,
"For an appointment, it will only work with "Customer Booked appointment," not with "appointment," as appointments are the general triggers and "Customer Booked appointment" is the trigger for the widget.
"Which Event Details Parameters do we need to use"?
Event Source URL
"Which Customer Information Parameters can we use"?
Client IP address - do not hash
Client user agent - do not hash
Email Address
First Name
Surname
Browser ID (fbp) cookie – do not hash
Click ID (fbc) cookie – do not hash
"Can I use Custom Values for the Access Token and Pixel Id"?
Yes, Custom Values will work in those fields.
"Why don't I see test events in Facebook Business Manager"?
If you don't see a test conversion, check the Diagnostics tab for any errors. A common issue we've seen is when FB has blocked the domain, so check Settings > Scroll to the bottom to "Domains In Your Allow List," where you can approve the domain.can
"Does the 'Test Workflow' button work with testing FB conversions"?
As of a recent update, we now support the Test Workflow button to test FB Conversion API workflows.
"Why is Facebook reporting the conversion as "Custom Event" when I selected "Lead"?
This happens when you send test data (we're not sure why Facebook does this), but it will show "Lead" when you run a live conversion. "
Shopify Integration
How To Integrate Fin Suites With Shopify?
Integrating Shopify with a Fin Suites sub-account is a 2 step process:
1. Create a Custom App in your Shopify Store
2. Connect Shopify to your Account
Step-1: Create a Custom App in your Shopify Store
Before we setup integration we need to create a custom app in your Shopify store.
1.1 Login to your Shopify store and click on "Apps" in your dashboard
1.2 Then, click on "Develop apps" on the top of the screen
1.3 Then, click on "Allow custom app development" (if you have already enabled this permission then Shopify will take you to Step-1.5)
1.4 In the next screen, click on "Allow custom app development"
1.5 Then, click on "Create an app"
1.6 Enter a name for the app (for example "Marvel's App"), select your email under App developer and click on "Create app"
1.7 Then, click on "Configure Admin API scopes" to configure Admin API integration
1.8 Search/scroll down to the "Orders" and You will need to enable at the very least "read_orders" access
1.9 Add the "read_customers" scope. In configuration edit the "Admin API Integrations". In this section undercustomers, select the "read_customers" tick box.
1.10 Then, Search/scroll down to the "Products" and You will need to enable at the very least "read_products" access
1.11 Once you've enabled read access on "Orders and Product", save the app by clicking on the "Save" button on the top right
1.12 After saving click on the "Install app" as in the image below
1.13 Then, click on "Install" from the pop up as in the image belowand voilà your App is ready to be integrated now!
1.14 After installing, the "Admin API access token" that you need for the Shopify integration can be found under the API credentials section, click on "Reveal token once" to get access to the token
1.15 Copy the "Admin API access token" by clicking on the clipboard icon
Step-2: Connect Shopify to your Account
2.1 In your Account go to Settings > Integrations and click on "Connect" under Shopify
2.2 Paste the "Admin API access token" you copied in Step-1.14, enter "Name of your Shopify store" and click "Connect"
2.3 Your Shopify integration is done!
Shopify Elements in Fin Suites
Automation > Workflow > Triggers (select trigger: Abandoned Checkout/Order Fulfilled/Order Placed)
Automation > Workflow > Actions > If/Else Condition (select segment: Shopify/Product Name/Requires Shipping/ Total Cart Price/Total Discount/Total Order Value/Total Shipping Price))
Custom Values (search for Shopify)
Email Marketing > Email Builder (Content > Elements > Shopping Cart)
TikTok Integration
How to Integrate TikTok Lead Ads
Please Note: Currently multi-select options for TikTok Lead Ads are not supported as of now. This will be supported in the next few releases.TikTok integration will not work in countries where TikTok is banned by the government (VPN will help here). We are supporting only lead generation in-feed ads.
TikTok has become one of the fastest-growing social media platforms. Its popularity has increased exponentially over the last couple of years. The company has recently announced its intention to launch a new advertising program called TikTok Leads. This new feature allows advertisers to target their ads directly at TikTok users who have already expressed interest in their brand or service.
How it works
Once the page is connected and subscribed, you will get leads from your TikTok ads.
How to Integrate TikTok Leads Ads
To enable TikTok Ads as an integration, please head into the "labs" section in your sub-account settings.
Step 1: Go to Settings
Step 2: Click on the 'integration' tab & login.
Now that the TikTok Integration is live in your sub-account. Please proceed to log into your TikTok Business Account.
Check all permissions (enabled by default) > Click 'confirm.'
If you have multiple advertiser accounts, please select the advertiser account you wish to connect. Once the account is selected, the tab will automatically close, and your TikTok business account will be integrated.
Please note: If you have only one advertiser account, this account will be selected by default.
You can change the advertiser account at any point in time by clicking the change advertiser account button.
Step 3: Map Fields and or create Custom Fields
Once your Tiktok business account is connected, please navigate to the TikTok form mapping tab to see all the pages/forms you have created in the TikTok business.
Click on the 'Map Fields' button to map your form fields with the CRM fields. Click on Update to save your changes and subscribe to the page.
Please Note: Currently multi-select options for TikTok Lead Ads are not supported as of now. This will be supported in the next few releases.
Supported Custom Fields when using TikTok Lead Ads:
TEXT
LARGE_TEXT
NUMERICAL
PHONE
MONETARY
SINGLE_OPTIONS
DATE
Step 4: Create your TikTok Lead Ads Workflow
Please add a Workflow trigger step 'TikTok Form Submitted'> Add Filter > Select Form
Once your Tiktok business account is connected, please navigate to the TikTok form and submit the form to see if leads are being added to the CRM.
Troubleshooting
I see an error message No pages for this account. What should I do?
If you encounter this error while integrating your business account, please ensure you have created an instant form in your TikTok business account. Please follow these steps.
My TikTok 'Access Token' is expired. What should I do?
If your access token is expired, please disconnect your account from the CRM integration page. Once you re-integrated, the CRM will generate a new access token. if you continue to have this issue, please notify the support.
I changed a question on my Lead Ad Form during a live campaign. What should I do?
Let's say you updated your lead ad form within TikTok to capture a new desired response. You will need to head back into your sub-account settings and create a custom field for the new desired response. Once this is complete, head back into the 'TikTok Form Fields Mapping tab,' hit the edit button, and select the new custom field you had just created.
If you want to stop all inbound leads, toggle the status off:
Can the same TikTok account ID be connected to multiple sub-accounts in Fin Suites (same agency or across different agencies) without issues?
Yes, as long as both accounts have the TikTok Form fields mapped.
What are all the permissions on TikTok that the person who connects the integration will need to maintain so that the integration token does not expire?
Only LeadConnector needs permission, which is taken care of when the integration is connected. User permissions and access are not an issue.
What would cause the integration token to expire, and how can we minimize it on our side to ensure a stable integration?
TikTok grants the CRM a permanent access token, so the integration should remain intact unless manually broken off by the user. We will display an Integration expired message under the TikTok integration option in settings> Integration.
Zoom Integration
Zoom Integration for Users' Calendar Bookings
Note: Dynamic Zoom links are only available with Round Robin and Collective Calendars.
Zoom is a communications platform that allows users to connect with video, audio, phone, and chat simultaneously! Integrating your Zoom account with group calendars is easy to set up and is a great way to take your productivity to the next level. By syncing your Zoom account with your calendar(s), you can quickly schedule appointments, send out reminders, and keep track of upcoming events - all in one place!
What Is the Zoom Integration?
The Zoom integration with this CRM allows users to schedule, start, and manage Zoom meetings directly from within the platform. This provides a seamless experience for users, removing the need to switch between different applications and platforms.
Once the Zoom integration is set up within the CRM, it is capable of dynamically generating unique Zoom meeting links for each new meeting that is scheduled. This process is automatic when the meeting location in the user availability and calendar settings is set to Zoom.
This unique meeting link generation is a significant feature as it provides added security and reduces the chance of unwanted interruptions during your meetings. Each participant gets a different link, making it harder for unauthorized persons to gain access.
For instance, if you're scheduling a meeting with a client, once you select Zoom as the meeting location, the CRM will automatically create a new Zoom meeting and embed the unique meeting link within the calendar event. The client will receive an invitation to the meeting with the unique Zoom link. This link is for that single meeting, providing convenience and security for all parties involved.
In addition, the Zoom integration enables you to keep track of all these meetings within the CRM. All scheduled Zoom meetings are automatically documented within the platform, making managing your appointments and keeping track of your engagements easier.
Usage cases
Team Meetings: Make team collaboration easy with Zoom integration. A unique Zoom link is generated automatically each time a meeting is set, simplifying communication within your team.
Client Consultations: Streamline your client consultations with this integration. It automatically creates a unique Zoom link every time a client books a meeting, adding a layer of professionalism and ease to your interactions.
Webinars: Enhance your webinar experience with the Zoom integration. As a participant registers, a personalized Zoom link is automatically created, making webinar management seamless and efficient.
Virtual Office Hours: Teachers and professors can use the Zoom integration to manage office hours or extra help sessions efficiently. A unique Zoom meeting is created when students book a slot, eliminating scheduling hassles.
Online Fitness Classes: Fitness instructors can leverage this integration for effortless class management. Every time a client books a session, a unique Zoom link is sent out, providing a smooth virtual fitness experience.
Virtual Real Estate Showings: Transform your business with Zoom integration. As potential buyers schedule a showing, the system creates a unique Zoom meeting, bringing property viewing to their comfort zone.
Benefits of this feature:
Here are some technical advantages of the Zoom integration feature:
Automated Meeting Scheduling: A unique Zoom link is generated automatically for each meeting once the integration is set up. This saves significant time on manual setup and prevents errors.
Centralized Management: The integration allows users to manage all aspects of meetings, including scheduling, rescheduling, and cancellations, directly from the CRM. This centralization improves efficiency and reduces the likelihood of miscommunication.Multi-User Accessibility: Regardless of the number of participants, a unique Zoom link is automatically generated for each participant. This ensures security and improves the overall meeting experience.
Calendar Syncing: The integration allows Zoom meeting scheduling to be directly synced with the CRM calendar. This feature eliminates double booking and enhances time management.
Real-time Updates: Changes made in the CRM, such as rescheduling or cancellations, are reflected in real-time in the Zoom platform, thus reducing discrepancies and improving overall coordination.
Enhanced Security: Each meeting has a unique link, reducing the risk of uninvited guests joining a meeting.
Automated Notifications: The integration automatically sends participants notifications with meeting details and changes. This reduces the manual effort of sending out messages and improves meeting attendance.
Data Tracking: The integration allows for comprehensive tracking of meeting data, including attendance, meeting duration, and more. This can help in analyzing patterns and improving business processes
Integration Prerequisites
Any User can start using Zoom Integration for Calendars
Each User connects their own Zoom account to their Profile, and a unique link is generated with every booking on each Group Calendar(s) the User is assigned to
Dynamic Zoom links are only available with Round Robin and Collective Calendars.
Integrating the same Zoom Account with Multiple Users
Zoom integration is tied to unique User IDs in the backend, not email addresses. If a Zoom account is connected to a User ID, that same Zoom account can't be connected to a different User ID, even if it's the same email address.
This can cause issues for users with different email addresses within the same agency or users needing to connect their Zoom accounts across multiple agencies.
In specific scenarios, if a user account is deleted and restored with the help of Support, it could result in two User IDs associated with the same email address. This could lead to further complications as the restored account couldn't reconnect to the original Zoom account due to the new User ID.
It's crucial to remember that User IDs and email addresses are treated as distinct identifiers within the system, underpinning the integration with Zoom. It's essential to consider your User ID as the unique identifier for the integration, not your email address.
This might seem complex, but understanding this distinction will help avoid potential integration issues and alleviate frustrations.
Let's use some examples for a better understanding. Consider an agency, "ABC Marketing." They have three users:
User A with User ID "A001" and email "[email protected]"
User B with User ID "B002" and email "[email protected]"
User C with User ID "C003" and email "[email protected]"
Users want to integrate their Zoom accounts with their respective profiles on the agency's platform.
User A connects their Zoom account successfully with the User ID "A001". Suppose, for some reason, User A's Profile is deleted and restored by the client contacting Support. Upon restoration, User A is assigned a new User ID, let's say "A004", while their email remains "[email protected]."Here's where the confusion can start. User A tries to reconnect their Zoom account.
However, their Zoom account is still tied to the old User ID "A001". Therefore, when they attempt to connect using the new User ID "A004", the system blocks it. This is because, from the system's perspective, the Zoom account is already connected to a different User ID.
This is why it's crucial to remember that Zoom integration is linked to the User ID, not the email address. The system treats the User ID as the unique identifier when connecting to Zoom, even if the email address remains the same.
On another note, User A cannot integrate their Zoom account into User B's Profile either because the Zoom account is still tied to User ID "A001". So, even though they are within the same agency, they cannot share a Zoom account due to these unique User IDs.
Understanding this underlying mechanism should help avoid confusion and ease the integration process.
Please note: It is not recommended to connect different Zoom accounts to the same User across multiple sub-accounts or to use the same Zoom account across multiple users.
Step 1: Install the Zoom integration
You can configure Zoom for your scheduled meetings in the following ways:
User Integrations
User Profile > Integrations > Zoom > Connect
In the dialog box, click Connect to Zoom (If not already connected)
Enter your Zoom login credentials, then click Sign in.
You'll be prompted to grant permission for Zoom to access your Zoom account. Click Allow.
You'll be redirected to the platform, where Zoom appears under User Profile Integrations.
Default Meeting Location
User Profile > Default Meeting Location > Zoom > Connect
In the dialog box, click Connect to Zoom (If not already connected)
Enter your Zoom login credentials, then click Sign in.
You'll be prompted to grant permission for Zoom to access your Zoom account. Click Allow.
You'll be redirected to the platform, where Zoom appears under User Profile Integrations.
You can then select 'Zoom' from the dropdown and hit 'Save' to prompt a dialog ascertaining whether or not existing meeting locations across all other calendars need to default to Zoom.
Calendar Settings
Settings > Calendar Settings > User [x] > Meeting Location
In the dialog box, click Connect to Zoom (If not already connected)
Enter your Zoom login credentials, then click Sign in.
You'll be prompted to grant permission for Zoom to access your Zoom account. Click Allow.
You'll be redirected to the platform, where Zoom appears under User Profile Integrations.
You can then select 'Zoom' from the dropdown to have the meetings include Zoom links with every booking.
Please note: You must be logged in as the user to do the profile setting integration options. If you are unable to find the Profile setting option within the sub account-level settings, you must edit the user's role from the agency-level Team setting to assign the user to the specific location(s).
Configure Zoom for Other Users as an Admin
If the Zoom integration has already been installed in your account by the respective User, you can choose that as a Default Meeting Location for the User under Team Management.
Please note: Each User has to be currently log into their account to integrate Zoom. Agency admins can now use the "Login As User" Feature to complete this process for any user in the agency.
Step 2: Set up appointment reminder workflow with Zoom location
The Workflow Builder is a potent tool with many uses. Still, for this use case, it provides easy access to automate internal and external reminders of upcoming appointments, including the dynamic Zoom link. You can craft your workflow by combining the following triggers and actions or use one of the available templated Recipes.
Click on "Add New Workflow Trigger"
Select "Appointment Status" as the trigger and add the following filters:
Event Type: Is this a one-time appointment, a recurring appointment, or would you like it to fire for either
Appointment Status: The calendar setting for auto-confirming appointments would ensure all appointments trigger this filter
In Calendar: Optional if narrowing down specific calendars and specific users.
Click on "Add your first Action." The first action needed is a one-minute time delay "Wait" step to ensure the meeting location value is updated.
The following action steps would begin your appointment booked confirmation notifications: "Send Email/SMS" would notify the contact on their listed primary email and phone number. Be sure to include the custom value in your messages to provide them with the dynamic zoom link.Zoom
Optionally, you can include email, sms, and in-app appointment reminders to the assigned User or any external contact using the "Internal Notification" action.
Best Practice: If sending internal notification email, use [email protected] or [email protected] to ensure no confusion with contact initiated conversations.
The last step is defining the cadence of notifications using the "Event/Appointment Time" wait for action in unison with the previous Send Email/SMS and Internal Notification actions.
Specify how long you want to send the next reminder before the event. In this example, it will wait for 24 hours before the following action (send email/sms or internal notification) will fire meeting.
Move to the next step: fire the next action and follow the workflow linearly.
Move to a specific step: this will move the lead to a particular action in the workflow.
Skip all outbound communication actions until the next wait step: Will not send any email/sms and moves the lead through the workflow linearly until the next wait step.
What to do if you do not have a Profile tab on your sidebar?
If you do not see the "Profile" tab on your sidebar, you are not a user/employee within that respective sub-account/location. Please add yourself to that sub-account as a user by clicking My Staff > + Add Employee > Add Employee >Save.
If you want to add your agency user profile to this sub-account as an employee, please head back to your Agency View > Agency Settings > Click on the"Team" tab > Search for User > Click on "User Roles" > Click "Add to Sub-account" > Select which subaccount you want to add them to.
Handling Meeting Links when Meetings are Edited
If your meeting date and time are the same, the Zoom meeting link generated prior continues to function as intended.
Handling Meeting Links when Meetings are Deleted
If your meeting is canceled or deleted, the Zoom meeting link will be dropped permanently unless there is another meeting for the same time slot using the same meeting link.
Handling Meeting Links when Meetings are Rescheduled to a different time
If your meeting is rescheduled, a new meeting link will be generated unless there is another appointment in the same time slot, in which case, the link generated prior would be re-used.
Handling Multiple Zoom Meetings at the Same Time Slot
If the Calendar Settings allow for multiple appointments per slot, then the same meeting link would be re-used across all the meetings.Please note: Currently, a single user may only use up to 100 requests per day (UTC) to create, update, or delete meetings. This 24-hour period resets at 00:00 UTC, not the user or account’s local timezone.
Existing Zoom Events Not Reflecting in the Calendar
Currently, Zoom Integration neither pulls in events from Zoom nor uses pre-generated meeting links on meetings created directly via Zoom.
Calendar Version Support
Currently, the dynamic Zoom Integration only works with Group Calendars.
How do I integrate my Zoom account with an unassigned calendar
Unassigned booking calendars can use static or pre-generated Zoom meeting links by manually adding the static link to the meeting location setting under Team and Event Setup.
How to set up appointment reminder workflow with Zoom location
Click on Add New Workflow Trigger
Click on Select (Choose a Workflow Trigger), Click on Appointment
Click on Add filters, Click on Select, Click on Appointment status is, Click on Select, Click on confirmed, Save Trigger
Click on +, search "Wait", Set Wait Delay for 1 minute, Save Action and continue to build the rest of the appointment reminder workflow
Click on + after the wait step
Choose to send Email/SMS to send the appointment confirmation to the lead, customise the text with custom values
Missed Call Textback
Call Tracking and Missed Call Text Back Through Google Business Profile
Google Business Profile (GBP) allows a business to register two phone numbers, which creates an excellent opportunity for Agencies to track calls generated from Google Business Profile listings while keeping with SEO best practices (i.e.moving the business' real phone number to the secondary slot has not been found to negatively affect rankings).
The Fin Suites Google Business Profile integration enables you to automatically move your client's main business number to the secondary slot and add their LeadConnector number to the first slot.
When you toggle on GBP Call Tracking, the following happens:
If the phone number in GBP is already a LeadConnector number from the Fin Suites sub-account, nothing will be changed as the business's calls are already being tracked in Fin Suites.
If the phone number in GBP is also the forwarding number for any of the LeadConnector numbers in the Fin Suites sub-account, Fin Suitesl will move the current number to the secondary slot and add the LeadConnector number in the primary slot.
If the phone number in GBP is not the forwarding number for any of the Twilio numbers in the corresponding Fin Suites sub-account, Fin Suites will move the current number to the secondary slot, add the LeadConnector number in the primary slot, and set the current number as the forwarding number for the LeadConnector number in the Fin Suites sub-account.
Dashboards
How to create multiple Dashboards?
The Multiple Dashboards feature is a groundbreaking addition to the GHL platform, enhancing your dashboard experience and providing unprecedented flexibility. With this update, users can create, manage, and customize multiple dashboards, tailoring their data visualization to unique needs. The introduction of these features empowers users to elevate their analytical capabilities, offering a more intuitive and personalized experience.
Key Benefits:
Enhanced Flexibility: Users can now go beyond the constraints of a single dashboard, allowing them to organize and view data in a way that suits their preferences.
Time Savings: The ability to clone dashboards simplifies the process of creating new dashboards, saving time and effort for users who need similar configurations.
Granular Control: Custom permissions ensure that data is shared selectively, with users having precise control over who sees specific dashboards.
Organized Insights: The option to delete dashboards and pin favorites enables users to maintain a clutter-free and organized dashboard environment.
Multiple Dashboard Features
Feature 1 - Creating Dashboard
Users can create new dashboards to curate data and insights according to their specific needs. This functionality is available to users on the platinum plans, including both Agency and Account users.
Feature 2 - Clone Dashboards
This feature enables users to duplicate existing dashboards, streamlining quick modifications and minimizing repetitive setup. Both users with Full and View-only access have the capability to clone an existing dashboard
Feature 3 - Manage Permissions
Owners and Users with FULL access to a dashboard can manage permissions for different roles. Dashboards can also be set as Private Dashboards, which won't be visible to other team members.
Feature 4 - Delete Dashboards
Dashboard Owners can remove dashboards they no longer need, decluttering their workspace.
Feature 5 - Pin Dashboards
Users can prioritize important dashboards by pinning them for quick and easy access.
Feature 6 - Default Dashboard
Users can set Default Dashboard and ensure that everyone starts their day with the most critical information at their fingertips, without any hassle. Default dashboards serve as the primary landing page for all users, while pinned dashboards are personal favourites that individual users can access quickly.
Feature 7 - Granular Insights
Users can view records and granular details for all charts and widgets by clicking on any component, whether it's a node on a line graph or a bar in a bar graph, to unlock a treasure trove of data. The records can also be downloaded by clicking on the export icon on the record view pop up.
Feature 8 - Exporting Widget Records
The records can be downloaded by clicking on the export icon on the record view pop up for widgets. For Table widgets the export icon is present on the widget. Previously, data mismatches between dashboard widgets and other platform modules caused confusion, stemming from differing time zones. With this solution, users can effortlessly synchronize their dashboard data with their local time, enhancing efficiency and accuracy. This feature provides users with the flexibility they need to optimize their data analysis.
How to create multiple Dashboards?
Step 1: Navigate to Dashboards Menu
Click on the blue dashboard navigation button, found on the left side of your screen.
Step 2: Click on "Add Dashboard"
Step 3: Assign a Title
Give your dashboard a clear and descriptive title that aligns with its reporting purpose.
Step 4: Configure Permissions
Set up permissions for your dashboard according to your preference. Choose between keeping it private for personal use or sharing it with your entire team.
Step 5: Click "Confirm"
Step 6: Add widgets
Click on "Add Widget" or explore suggested widgets to initiate your dashboard reporting. Learn more about adding custom widgets hereNote: Wondering which plan unlocks the customizable multiple Dashboards?
How to manage permissions for a dashboard?
Tailor your dashboard experience by setting custom permissions according to your preferences. Whether you prefer privacy or collaborative sharing, our platform allows you to customize permissions seamlessly.
Dashboards offer the following levels of permissions:
FULL - Gives the person the ability to create, edit, share, and delete Dashboards
EDIT - Gives the person the ability to edit a dashboard and the widgets. The person isn't able to delete the dashboard.
VIEW - Gives the person read-only access to a Dashboard
ACCESS - Restricts access to the dashboard entirely
Note: Only Account Admin or Agency Roles with FULL access to a Dashboard are eligible to set it as a default dashboards.Duplicate to another Sub-Account is only accessible to Agency Roles.
Permissions for Different Roles
Permissions screen and options changes as per the role of the logged in user
Agency:
1) Agency Admins will always have FULL access to all dashboards expect Private Dashboards.
2) Agency can set access and permissions rules for Agency Users, Account Admins and Account Users
Account:
1) Account users can set access only for Account Admins and Account users
2) Agency Admins and Agency Users will always have FULL access to dashboards created by Account Admins/Users except Private Dashboards.
Hierarchy for Roles and Permissions
Dashboard Permissions within our platform follow a clear hierarchy to ensure smooth management of access levels:
Agency Admins > Agency Users > Account Admins > Account Users
This hierarchy dictates that permissions for lower-level roles are automatically adjusted based on changes made to higher-level roles, and vice versa.
Example: Let's consider a scenario where both Account Users and Account Admins have EDIT permissions:
If the permission for Account Admins is modified to VIEW only, the permission for Account Users will also be automatically adjusted to VIEW.
This logic ensures that lower-level roles cannot possess higher access levels compared to higher-level roles, maintaining consistency and security across the platform.
How to Manage and Update Dashboard Permissions
Step 1: Setting Up Permissions While Creating a New Dashboard
Customize permissions during the dashboard creation process. By default, new dashboards are set to Private. Click on the toggle to change the permissions for the dashboard
Step 2: For an existing dashboard, click on the 3 dots
Navigate to the dashboard you want to manage. Click on the three dots located at the top right corner of the dashboard. Only Dashboard Owners and Users with FULL permission can manage and update dashboard permissions
Step 3: Click on "Manage Permissions"
Step 4: Update Permissions
Toggle Private Dashboard to keep the dashboard exclusively for yourself. Agency Admins will get FULL access to all non private dashboards.
If you want to share the dashboard with other team members and roles, make sure that the Private Dashboard toggle is off. Update the permissions as per the requirement
Step 5: Save Your ChangesClick on "Save" to apply the updated permissions.
How to clone a dashboard (in the same location)?
Efficiently reuse your existing dashboards and save valuable time by leveraging the cloning feature. This guide will walk you through the steps to successfully clone a dashboard.
Step 1: Navigate to the DashboardIdentify the dashboard you wish to clone.
Step 2: Access Dashboard OptionsIn the top right corner, click on the three dots.
Step 3: Select "Clone"
Step 4: Customize Title (If Required)
Step 5: Update Permissions (If Required)Optionally, adjust permissions for the cloned dashboard to suit your needs.
Step 6: Click "Confirm
How to Edit a dashboard?
Dashboard owners wield the power to enhance their reporting capabilities by editing dashboards. This includes the ability to modify the dashboard name, update permissions, add new custom widgets, and edit existing widgets. Follow these steps to harness the full potential of dashboard editing.
Step 1: Navigate to the Dashboard
Identify and navigate to the specific dashboard you intend to edit.
Note: Only dashboard owners have the authority to edit a dashboard.
Step 2: Access Edit Mode
Click on the pencil edit icon located in the top right corner. This action will transition you into the edit mode
Step 3: Modify Dashboard Name
If needed, change the dashboard name to better suit your reporting requirements.
Step 4: Add New Widgets
Click on "Add Widgets" to introduce new custom widgets to your dashboard. For a detailed guide on adding custom widgets, refer here
Step 5: Save Changes
Once you've made the necessary edits, click on "Save Changes" to apply and finalize the modifications.
How to set a Default Dashboard?
Default Dashboards are your key to streamlining collaboration and ensuring that your team stays aligned with the most critical insights at all times. The default dashboard becomes the first thing your team members see when they navigate to the dashboard section, ensuring instant access to essential insights and metrics.
Step 1: Navigate to the DashboardNavigate to the dashboard you want to set as the default. This could be your main dashboard containing the most important metrics for your team.
Step 2: Click on the three-dot menu located in the top right corner of the dashboard.
Step 3: Set as Default Dashboard
Step 4: Confirm
Important Notes
1) Permissions Required: Only users with Account Admin or Agency Roles with FULL access to a Dashboard can set default dashboards.
2) Viewing Permissions: All team members must have at least VIEW permission for the dashboard to be set as default.
3) Non-Deletable Default Dashboards: Once set as default, a dashboard cannot be deleted until another default dashboard is assigned.
3) Distinguishing Default and Pinned Dashboards: Default dashboards serve as the primary landing page for all users, while pinned dashboards are personal favorites that individual users can access quickly.
Important
If you are experiencing issues with your default dashboard being changed after this release, you can revert it back by following the above instructions. Please note that existing dashboards and widgets are not affected. We identified a bug post-release, but the patch has been deployed to address it. If you are still facing any issue, please reach out to our support team.
Affiliate Manager
How does Affiliate Manager work?
1) Once an affiliate campaign is created and published/live, all the enrolled affiliates will receive their unique affiliate link, which they can share with their network.
2) When a customer signs up through an affiliate link, the payout, and commission are recorded and published on the ', Payout - Pending' tab on the 1st of the month.
3) The affiliate owner can see the list of all the generated payouts and choose to approve or deny them for a payout.
4) Once approved for a payout, the affiliate owner needs to take an export and upload it on their payment gateway to manually make the payment as per that CSV to make the payment as per that CSV manually.
5) Once the payment has been made, the affiliate owner needs to update the status in Affiliate Manager to paid so that correct reporting gets reflected for that Affiliate and the overall campaign.
Affiliate Setup Guide
Step 1: Create your Funnel & Add products
Affiliate Manager - (Step 1) How to Set Up your Affiliate Funnel with Products Print?
Pre-requisites:
A domain is set up - Domain Setup (Funnels & Websites)
A product set up
Using memberships
Setting up an affiliate product is no different than setting up any product within a funnel or website within the system.
The only difference is that once the funnel has a domain and product setup you would then move into the 'Affiliate Manager Campaign Settings' and filter down to the specific product and funnel/website you just created (see image below).
Step 2: Upload or add affiliates to the Affiliate Manager
Manually Add an Affiliate
1) Login to Fin Suites:
Open Fin Suites and log in with your credentials.
2) Navigate to the Contacts Section:
Go to the “Contacts” section from the dashboard.
3) Add a New Contact:
Click on the “+ Add Contact” button, typically located at the top right.
4) Fill out the contact details such as name, email, phone number, etc.
5) Tag the Contact as an Affiliate:
In the contact information, you can add tags. Use a specific tag like “Affiliate” to categorize this contact as an affiliate.
You can also use custom fields to add more specific affiliate-related information.
6) Save the Contact:
Once all the information is filled out, click “Save” to add the affiliate to your contacts.
Bulk Upload Affiliates
1) Prepare a CSV File:
Create a CSV file with all the necessary fields (e.g., name, email, phone number, tags). Ensure each column in your CSV corresponds to a field in Fin Suites.
2) Navigate to the Contacts Section:
Log in to Fin Suites and go to the “Contacts” section.
3) Import Contacts:
Click on the “Import Contacts” button.
Select the CSV file you prepared.
4) Map Fields:
Fin Suites will prompt you to map the CSV columns to the appropriate fields in the system. Make sure to correctly map the fields such as name, email, and tags.If you have an "Affiliate" tag or any other specific identifier in your CSV, map it to the appropriate field.
5) Upload the CSV:
After mapping the fields, proceed with the upload.Fin Suites will import the contacts and apply the tags, categorizing them as affiliates.
6) Verify the Import:
Once the upload is complete, check your contacts list to ensure that the affiliates have been properly added and tagged.
Optional: Create a Smart List
To manage affiliates more effectively, consider creating a Smart List:
1) Create a Smart List:
In the “Contacts” section, use the filtering options to search for all contacts tagged as “Affiliate”.
Save this search as a Smart List for easy access to all affiliates.This method allows you to keep your affiliates organized and easily accessible within Fin Suites.
Step 3: Create an Affiliate Manager Campaign
To create an Affiliate Manager campaign, follow these steps:
1) Access the Campaigns Section:
Log in to Fin Suites and navigate to the “Marketing” or “Campaigns” section.
2) Create a New Campaign:
Click on the “+ New Campaign” or “Create Campaign” button, usually located at the top right of the campaigns dashboard.
Name your campaign (e.g., “Affiliate Manager Campaign”) to help you easily identify it.
3) Select the Campaign Type:
Choose the type of campaign you want to run. Depending on your goal, this could be an email campaign, SMS campaign, or a combination.
If Fin Suites offers a specific template or setup for affiliate management, select that option.
4) Design the Campaign Flow:
Set up the sequence of actions in your campaign. For example:
Email 1: Welcome email to new affiliates, introducing them to the program and providing key resources.
Email 2: Follow-up email with tips on promoting your products/services.
SMS: Optional SMS reminders about important updates or promotions.
Customize the content of each email or message to suit your affiliate program.
5) Add Triggers and Conditions:
Define the triggers that will initiate the campaign. Common triggers could include:Adding the “Affiliate” tag to a contact.
When an affiliate submits a lead or sale.
Set conditions if needed, such as sending specific emails based on the affiliate's performance or engagement level.
6) Set Timing and Scheduling:
Choose when each message in the campaign will be sent. You can schedule emails to be sent immediately after the trigger, after a certain time delay, or on specific dates.
Consider creating a drip sequence that gradually nurtures affiliates over time.
7) Configure Tracking and Goals:
Set up tracking for key performance indicators (KPIs) like email opens, link clicks, and conversions.
Define the goals for your campaign, such as driving a certain number of sales or leads through affiliates.
8) Test the Campaign:
Before launching, test the campaign to ensure all triggers, emails, and conditions are working as intended.
Send test emails to yourself or a team member to check for accuracy and formatting.
9) Launch the Campaign:
Once you’re satisfied with the setup, activate the campaign.
Monitor its progress regularly to ensure affiliates are engaging with the content and performing as expected.
10) Monitor and Optimize:
After the campaign is live, review its performance using the analytics provided by Fin Suites.
Make adjustments to improve open rates, click-through rates, and overall engagement.
Consider segmenting affiliates based on their performance and creating tailored follow-up campaigns.
Step 4: Managing Affiliate Payouts
Managing affiliate payouts is a critical part of maintaining a successful affiliate program. Here's how you can efficiently handle this process:
1) Access the Affiliate Section:
Log in to Fin Suites and navigate to the “Affiliates” or “Payouts” section within the platform.
2) Review Affiliate Performance:
Look at the performance metrics for each affiliate.
This typically includes:
Total sales or leads generated.Commission percentage or flat rate agreed upon.Any bonuses or incentives earned.
Ensure all the data is accurate before proceeding with payouts.
3) Calculate Earnings:
Use the data provided by Fin Suites to calculate the total earnings for each affiliate.The platform might automatically calculate the commissions based on the sales data and the predefined payout structure.
Double-check the calculations, especially if there are any custom deals or special incentives.
4) Prepare the Payouts:
Depending on the payment method supported by your affiliates, prepare the payouts accordingly:
Bank Transfer: Gather the necessary banking details from your affiliates.
PayPal: Ensure you have the correct PayPal email addresses.
5) Other Payment Methods:
For other methods like checks or digital wallets, collect the required information.
If using Fin Suites’ integration with a payment processor, follow the prompts to initiate payments.
6) Process the Payments:
Once everything is set, process the payments through your chosen method:
Automated Payouts: If Fin Suites supports automated payouts, configure it to disburse payments at regular intervals (e.g., monthly, bi-weekly).
Manual Payouts: For manual payments, process each payment individually or in bulk, depending on the number of affiliates.
Confirm that each payment has been successfully completed.
7) Record the Transactions:
Maintain detailed records of all payouts made.
This includes:
Date of payment.
Amount paid.
Method of payment.
Any transaction IDs or confirmation numbers.
If Fin Suites offers a payout history or report feature, use it to keep track of these details.
8) Notify Affiliates:
Send an email or notification to each affiliate confirming their payout.
Include a breakdown of the payment details, such as the total amount, commissions earned, and any deductions or bonuses.
Provide a contact method for affiliates to reach out if they have questions or concerns about their payment.
9) Monitor Payout History:
Regularly check the payout history to ensure there are no discrepancies or missed payments.
Use Fin Suites’ reporting tools to generate periodic reports on affiliate earnings and payouts.
10) Adjust Payout Settings (If Necessary):
If you need to update commission rates, payment schedules, or payment methods, adjust the settings in Fin Suites.
Communicate any changes to your affiliates in advance.
11) Handle Disputes or Issues:
Be prepared to address any disputes or issues that may arise regarding payouts.
Work with affiliates to resolve discrepancies, ensuring transparency and maintaining trust.
How does someone get signed up as an affiliate on their own?
You can set up an Affiliate Manager workflow to automate the process.
How to automatically add, remove, and update an Affiliate using Workflows?
Workflows have automated actions to manage affiliates efficiently, including adding contacts to the affiliates list, updating their status, and adding or removing them from a campaign. The Affiliate Created trigger is also available, simplifying managing affiliates and making the journey more organized and efficient.
What is the Affiliate Manager Workflow capability?
The Affiliate Manager now supports several automated actions and triggers to help manage affiliates efficiently. The four steps in the Workflow include adding a contact to the affiliates list with an active status by default, updating an affiliate's status as active or inactive, adding an affiliate to a campaign, and removing an affiliate from a campaign. steps
Additionally, the Affiliate Manager now features a trigger called Affiliate Created, activated when an affiliate is created. This new automation capability can help streamline and simplify managing affiliates, allowing for a more organized and efficient affiliate management journey.
Who are these new Workflow Actions and Trigger useful for?
The new automation features for the Affiliate Manager are helpful for anyone who manages a network of affiliates, such as affiliate managers, marketing teams, and business owners. These features can help streamline managing affiliates, allowing users to automate various tasks and ensure that affiliates are appropriately categorized and assigned to the appropriate campaigns. correctly
What are the benefits of these features?
The new automation features in the Affiliate Manager offer several benefits, including:
Increased efficiency: Automation can help streamline and simplify managing affiliates, saving users time and resources.
Better organization: The new features allow for more organized and structured management of affiliates, ensuring that each Affiliate is appropriately categorized and assigned to the appropriate campaigns.
Improved accuracy: Automation can reduce errors and improve accuracy in managing affiliates, ensuring that the right actions are taken at the right time.
Increased revenue: By automating various tasks, users can focus on more critical aspects of their business and potentially increase revenue and profitability.
How to set up the Affiliate Manager Workflow Actions and Trigger?
Head to Automation>Workflows>Create Workflow.
Click on Start from Scrarch> Create New Workflow (If your Workflow does not already exist)
The Affiliate Created Workflow Trigger
Click on Add new Workflow Trigger>Search for Affiliate Created>Choose i.t
Click on Save Trigger
This workflow trigger will be fired off when an Affiliate is created in that sub-account.
Affiliate Workflow Actions
There are four actions available for the Affiliate section of Workflow Actions.
Add to Affiliate Manager
Adds a contact to the Affiliates list in the Affiliate Manager with status as active by default.
Update Affiliate
Updates the affiliate as either active or inactive.
Supported options:
Mark as Active
Mark as Inactive
Add to Affiliate Campaign
Adds an affiliate to a campaign in the Affiliate Manager>Campaigns tab. It lets you choose the desired Affiliate Campaign from a dropdown.
Remove from Affiliate Campaign
Removes an affiliate from a campaign. It lets you choose which campaign to remove them from using a dropdown.
How do I find my affiliate user's link? (The email wasn't sent).
The email goes out to the email address of the Affiliate once a campaign is live.
The other way to pull the affiliate link is to go to the Affiliate -> Click on the Affiliate in question-> Click on the campaign dropdown -> Select the campaign -> You'll find the link to the right of the campaign.
You can also export the affiliates and get the affiliate links for all the affiliates.
How do Affiliates get their stats themselves?
They can't; as there is no affiliate view, a workaround would be to add them as users in an account.
How do Affiliates download their list of leads & list of buyers?
Affiliates can not perform any action on the Affiliate Manager as of now.
How do we tag existing buyers (on recurring) to the affiliates we imported?
Not possible at this moment.
I'm using coupons for my affiliate campaign. How is the affiliate commission calculated?
If a coupon is used during check-out, the discount value is considered revenue, and the commission is calculated off that discounted value.
How to create an Affiliate Campaign?
Start earning commissions with ease by creating your affiliate campaigns through a simple 3-step process. Our platform offers multi-tier support of up to 7 tiers, customizable commissions, direct affiliate assignment, and much more. Whether you're an experienced affiliate marketer or just beginning, our platform empowers you to create impactful campaigns effortlessly.
For those new to affiliate campaigns, they are a marketing strategy where businesses partner with individuals or other businesses (affiliates) who promote their products or services in exchange for a commission on sales generated through their referrals. Dive into the step-by-step guide below to discover how to maximize your affiliate marketing efforts.
Step 1: Click on Add button in the Campaign page:
Begin by navigating to the Campaign page and clicking on the "+ Add" button to start the campaign creation process.
Step 2: Choose your campaign source:
Rename your campaign by clicking on the pencil edit icon located on the top bar. The system automatically provides a Campaign Name for all new campaigns.
Select the source for your affiliate campaign, such as the funnel or the website where your products are listed.
Step 3: Configure source details:
Provide the necessary details to generate your campaign's default URL.
Once configured, you can view the generated default affiliate campaign URL.
The <> placeholder will be replaced with a unique affiliate ID for each affiliate assigned to this campaign. By default, these IDs are system-generated, but you can customize them in the Affiliate profile settings.
Step 4: Review product list:
Once configured, review the list of products associated with your chosen source, including product name, price, and type.
Modify the product list as needed by deleting or adding products. This list will have the products eligible for commissions.
Step 5: Set default commission
Define default commissions for the campaign, either as a flat number or a percentage of the product price, to be applied to all products.
Step 6: Customize product-level commissions:
Optionally, set commissions at the product level to tailor them according to individual product prices.
Step 7: Enable multi-tier commissions:
Access the Advanced Commissions settings to enable and configure multiple tiers for your affiliate campaign, supporting up to 7 tiers.
Step 8: Configure tier-specific commissions:
Set default or product-based commissions for each tier to incentivize affiliates at different tiers.
Step 9: Add campaign description:
Provide an optional campaign description to provide context and attract affiliates to join your campaign.
Step 10: Assign affiliates directly:
Review affiliate details, such as joining date and total number of affiliates, before directly assigning them to the campaign.
Step 11: Adjust additional settings:
Customize additional settings, including choosing the email template for onboarding new affiliates, setting the cookie life, and defining payout terms.
For Products with Setup Fees, you can toggle if you want to include Setup Fees in commissions calculation as well
You can also toggle if you want to enable the sub affiliate signup forms for this campaign
Choose if you want to auto enroll new customers as sub affiliate. When enabled, new customers will automatically be enrolled as sub affiliates under the affiliate who brought them in.
Step 12: Publish or save draft:
Finally, choose to publish your campaign immediately or save it as a draft for further editing.
Congratulations! Your affiliate campaign is now live and ready to drive results.
How to setup Multi tier commissions for your Affiliate Campaigns?
Multi-tier commissions, also known as multi-level marketing (MLM), are a popular commission structure in affiliate marketing programs. Our platform supports up to 7 tiers of commissions, enabling you to reward parent affiliates for sales generated by their sub-affiliates. This incentivizes affiliates to expand their network, increase their reach, and earn passive income.
In multi-tier commission structures, affiliates earn commissions not only on their own sales but also on the sales made by their sub-affiliates. With our platform, you have the flexibility to customize commission structures for each tier of your affiliate program. You can set fixed rates or percentages based on the total sale value, allowing you to compensate affiliates while maintaining profitability.
How do multi-tier commissions work
In a multi-tier commission structure, you can assign a commission to each tier in the campaign so that each affiliate benefits from the sales of their sub-affiliates. The percentages provided in the following example are meant to serve as an illustration.
Commission (1st tier): 20%
2nd tier: 10%
3rd tier: 5%
4th tier: 3%
5th tier: 2%
The commission rates would be fairly straightforward if you had a setup like this. As a result of making the sale, the first tier gets the majority of the commissions. As the percentage trickles “up,” it reaches the parent affiliate, then the grandparent, and so on.
For example:
If A is a referrer of a $100 sale, then:A gets $20 (1st tier commission)
B gets $10 (2nd tier commission)
C gets $5 (3rd tier commission)
D gets $3 (4th tier commission)
E gets $2 (5th tier commission)
For this sale, you would pay your affiliates $40 (20+10+5+3+2).
Our platform simplifies the process of managing multi-tier commissions, providing transparency and efficiency in your affiliate program. With our robust features, you can track commissions accurately and reward affiliates for their contributions effectively.
Step 1: Create a new affiliate campaign
Step 2: Enable multi-tier commissionsIn step 2 of the process, click on Advance Commissions settings to enable multi tier commissions
Choose the number of tiers you want.
Step 3: Configure tier-specific commissions
Set default or product-based commissions for each tier to incentivize affiliates at different tiers.
Step 4: Review and confirm Additional settings
Step 5: Publish your campaign
How to track leads from an Affiliate Campaign (Forms, Surveys and Calendars)
Seamlessly track leads from Forms, Surveys, and Calendars in your affiliate campaigns. Follow these simple steps to get started
Please Note : Currently Fin Suites only supports lead tracking for campaigns with forms, calendars and surveys. So Users will not be able to define commission settings for such campaigns
Step 1: Navigate to the Affiliate Campaign Page
Head over to Affiliate Manager under Marketing and click on the Campaign Page.
Step 2: Click on Add
Once on the Campaign Page, click on the 'Add' button to create a new campaign.
Step 3: Choose Sources
Select Forms, Surveys, or Calendars as the source for your campaign.
Step 4: Select Source DetailsUse the dropdown menu to specify the details of your chosen source.
Step 5: Review Default Affiliate Campaign URL: Take a moment to review the default affiliate campaign URL.
Please Note: If no branded domain is added for the account, the affiliate campaign URL will pick the default domain.
Users can add their own branded domain in Settings -> Business Profile -> Branded Domain.
Once added, the new domain will automatically reflect in all affiliate campaign URLs.
Head over to settings to add your own Branded Domain
Once Added, Affiliate Campaign URLs will update and use the Branded Domain
Step 6: Optional Steps
Add campaign descriptions, assign affiliates, and review additional settings as needed.
Step 7: Publish the Campaign:
Once you're satisfied with the campaign settings, hit the 'Publish' button to make the campaign live.
Step 8: Track Leads:
After the campaign is live, you can track leads under each affiliate profile page. Utilize the Source field in the Leads tab to get an overview of leads coming from forms, surveys, calendars, etc.
Important Note
Custom Embed/Iframes are not supported for lead tracking. Forms, surveys, or calendars must be added as components inside a funnel/webpage to enable tracking. When creating pages in a funnel, ensure forms, surveys, or calendars are added as components before using the funnel as a source in the affiliate campaign. Custom code embeds and iframes are not supported for lead tracking in affiliate campaigns.
Affiliate Manager Dashboard
For Affiliate Managers, the Dashboard provides streamlined access to crucial metrics and insights, easy affiliate management and efficient campaign optimization
Quick CTAs
Click on the New button to create campaigns or affiliates within the dashboard page
Campaign Picker
Either choose All Campaigns to get an aggregate view or choose specific campaigns to see the insights
Core metrics
Total Revenue, Total Customers and Conversion Percentage.
Conversion Trend
Dive into detailed insights with the Conversion Trend line graph, showcasing lead and customer trends for your campaigns.
Affiliate Leaderboard
Keep an eye on your top 10 affiliates based on revenue, commissions, leads, or customers.
Pending Actions
Get a quick view of pending payouts and commissions, ensuring you stay on track. Click on Pending payouts to quickly navigate to the payouts page.
Latest Updates
Stay in the loop with the latest affiliates added and the most recent commissions, complete with all the important details and actions. Levrage the ability to approve deny commissions within the dashboard.
How to enable Sub Affiliate Sign ups for Affiliates?
The Sub-Affiliate Sign-Up feature enables affiliates to recruit sub-affiliates independently by sharing sign-up links. This functionality streamlines the onboarding process, providing affiliates with greater autonomy and visibility of their sub-affiliate network.
Please Note:
1. Forms used for sub-affiliate sign-ups must include First Name, Last Name, and Email. If any of these fields are missing, the campaign will display an error. This can be resolved by fixing the form or selecting a different one.
2. This feature only works for affiliate campaign which have 2 tiers or more
While Creating a New Affiliate Campaign
Navigate to the last step of the campaign creation/edit process.
Click on Additional Settings.Toggle on Sub-Affiliate Sign-Up Page.
Select the desired form from the dropdown for sub-affiliate sign-ups.
Save the changes by clicking on Finish
Configuring in Global Settings
Go to the Affiliate Manager dropdown and click on Settings.
In Default Campaign Settings, toggle on Sub-Affiliate Sign-Up Page.Choose the default form for sub-affiliate sign-ups for all future campaigns.
Please Note: Changes in the default settings will only reflect for future campaigns that will be created. The new settings will not reflect in existing/older campaigns
Affiliate Portal
Once configured, affiliates will see a sign-up link in the affiliate portal.
Affiliates can share this link to recruit potential sub-affiliates.
The portal will display all active sign-up form links and a list of all sub-affiliates under each affiliate.
Affiliate Manager - How to Switch from FirstPromoter to Affiliate Manager?
How to export your affiliates from FirstPromoter
Step 1: Inside the FirstPromoter dashboard click on the 'Promoters' section > Click on the 'Export' button
Step 2: Once the export is complete. Please format your file to match the supported import format and download it as a CSV.
Step 3: Import your Affiliate CSV into the Affiliate Manager
Once the affiliates are uploaded into the CRM, you may now create Affiliate Campaigns using the 'Add' button or 'Edit' an existing campaign.
How to import contacts to Affiliate Manager?
Importing contacts to the Affiliate Manager will allow the affiliate administrator to synchronize contacts from their CRM to the Affiliate Manager.
Affiliate admins can:
Import all contacts to the Affiliate Manager
Search for specific contacts and import them
Filter the contacts by tags and import them
How can I import contacts to the Affiliate Manager?
Go to Marketing > Affiliate Manager > Click on '+ Add"
Click on 'Import from Contacts'
Select the contacts that you want to import as Affiliates.
What is the difference between an active and inactive affiliate?
Active affiliate - An active affiliate has been added to your campaigns and can use their tracking links to monitor their sales on the platform. This feature lets you easily keep tabs on how well your affiliates perform.
Inactive affiliate - Inactive affiliates cannot be linked to campaigns, and any tracking links will no longer work. However, their historical data from the affiliate manager is still stored and can be accessed.
How to mark an affiliate as active or inactive?
An affiliate can be marked as active or inactive by clicking the icon on the 'Status' column.
How can I mark affiliates as active or inactive in bulk?
Select the affiliates you wish to mark as active or inactive and click the button at the top.
What happens if I update the name, number, and email of my contact, who is also an affiliate?
If a user updates the name, number, and email of a contact in the CRM, these changes will also reflect for that affiliate.
What happens if I import a contact that already exists in Affiliate Manager?
If the contact already exists as an Affiliate in the Affiliate Manager, another contact with the same email-id can not be imported.
What happens if I import contacts with the same email-id in Affiliate Manager?
Affiliate Manager imports contacts with unique email-ids only. Only the first contact will get imported if two contacts have the same email.
Will contact be created for a manually added/uploaded affiliate?
No, a contact is not created for an affiliate that is manually added or uploaded in the existing set-up.
What happens to the affiliate if its contact card gets deleted?
The affiliate stays in the Affiliate Manager if a contact card is deleted.
How can my Affiliate see their stats on the Client Portal?
The Client Portal is a dedicated platform to enhance your affiliates' interaction with your business. This secure, user-friendly interface provides affiliates access to critical information like tracking leads, commissions, payouts, and customer data tied to their affiliate links. It fosters smooth communication and streamlined operations between your organization and its affiliates.
What is the Client Portal?
Client Portal is a centralized platform enabling clients to interact with your business across multiple domains. Logging into the portal allows clients to view and manage their affiliate commissions, join community groups, and access their membership courses. This one-stop access point enhances customer service and promotes client retention by facilitating easy communication and self-service.
Quick Review of the Affiliate Manager in Relation to the Client Portal:
1. Starting with the Affiliate Manager (Overview & FAQ):
For newcomers to the system, this comprehensive introductory guide on the Affiliate Manager covers all the basics and answers common queries.
2. How can my affiliate login to Client Portal?
After setting up your Affiliate Funnel with products - a process described in this detailed guide on Affiliate Funnel Setup, you can add affiliates to your system manually or in bulk.
3. What can my affiliates see in the Client Portal?
Upon logging in, affiliates will land on the Affiliate Dashboard, a part of the comprehensive Affiliate Manager Campaign. This dashboard gives affiliates access to important statistics and tools, like affiliate links, leads and customer counts, and payment details.
4. Managing Affiliate Payouts:
Your affiliates can view details about their earnings and payments due. You can manage these payouts using the process outlined in this guide on Affiliate Payout Management.
5. Updating an Affiliate using Workflows:
To make managing affiliates easier and more efficient, use Workflows to automate adding, removing, or updating an Affiliate.
Usage Cases for Affiliate Manager data visibility on the Client Portal:
Tracking Campaign Success: The dashboard on the Client Portal shows the count of leads, customers, and canceled customers who have signed up through an affiliate's links. This information can help your affiliates assess the success of their marketing efforts. They can identify which campaigns are working best and where to improve.
Viewing Payment Information:
By accessing the Commission screen, affiliates can view their earned commissions, the amount owed to them, and the total revenue they have generated for your business. This transparency can encourage trust and motivate them to improve their performance further.
Identifying Effective Channels:
By analyzing the leads and customers who have signed up through their links (accessible on the Leads/Customers screen), affiliates can identify which channels or platforms bring in the most sign-ups. They can then focus their efforts on these channels to maximize conversions.
Planning Future Campaigns:
All the statistics in the Client Portal can inform future marketing campaigns. Affiliates can identify successful strategies from their stats and replicate these in future campaigns.
Evaluating the Impact of Inactive Campaigns:
Affiliates who are part of inactive campaigns can still view their stats, even if they can't use their affiliate links. They could use these statistics to evaluate the potential impact of these campaigns if they were to become active again.
Analyzing Customer Behavior Post-Sign-Up:
With information on canceled customers, affiliates can understand the reasons behind customer drop-offs and strategize ways to minimize them.
Improving Communication with the Business:
Regularly checking their stats allows affiliates to have informed discussions with your team about their performance, issues, or suggestions for the affiliate program.
Please note: The information in the Client Portal can only be as accurate as the input data. Ensure all relevant data for your affiliates is correctly and promptly entered and updated.
How can Affiliates Access the Client Portal?
Adding Affiliate to Campaign: As an account owner, navigate to the Affiliate Manager and add your affiliate to an active campaign. Once added, they will automatically receive an email invitation to sign up on the MyPortal app.
Please Note: If your affiliate does not receive the invitation email, advise them to check their spam or junk folders. If the email is not there, double-check that you entered their email address correctly and that the campaign is active.
Your affiliate should click the link in the invitation email. This will redirect them to a sign-up page. Ask them to follow the prompts to create their account.
Please Note:
If your affiliate is having trouble signing up, advise them to ensure they enter the correct details and have a strong internet connection.
Affiliate Login: Once your affiliate has created their account, they can log in to the MyPortal app using their credentials or a one-time password provided during the sign-up process.
Please Note:
If your affiliate is having trouble logging in, advise them to ensure they are using the correct credentials. If they forgot their password, they can reset it using the "Forgot Password" function.
Accessing the Affiliate Dashboard:
Once logged in, your affiliate will land on the Affiliate Dashboard, where they can view their stats and affiliate links.
Please Note:
If the affiliate dashboard is not immediately visible upon login, instruct your affiliate to click on the 9 dots in the top right corner and choose "Affiliates."This process ensures your affiliate has access to the MyPortal app, enabling them to keep track of their stats, manage their affiliate links, and easily access necessary information.
What can my affiliates see in the MyPortal?
In the MyPortal app, your affiliates can access various information and insights.
Here's what they can see:
Dashboard Screen: Here, affiliates can view all their affiliate links associated with different campaigns they are part of. They can monitor the count of Leads, Customers, and Cancelled Customers who signed up through their affiliate links. Additionally, they can view their payment information, such as the total amount paid to them, the amount owed by the affiliate admin, and the total revenue they've generated for your business.
Please Note:
Affiliates should remember that their statistics and results might vary across different campaigns.
Leads/Customers Screen:
On this screen, affiliates can examine the details of leads and customers who signed up through their affiliate links. This data is crucial for understanding their reach and the effectiveness of their promotional efforts.
Commission Screen:
This screen provides a breakdown of the customers who signed up via their affiliate links, the commission amount owed to the affiliate, and the status of their payout. This allows them to track their earnings and payment status efficiently.
Please Note:
If the commission isn't reflecting in cash flows as expected, it could be due to various factors, such as return policies or the payment cycle. The Affiliate Manager just calculates the ideal amount. Make sure your affiliates know that.
Quick Pointers:
Affiliates should be aware that if they are added to an inactive campaign, they can view their stats, but their affiliate link will be disabled, preventing its use for that particular campaign
Where can my affiliate view their performance statistics?
Affiliates can view their stats on the Dashboard screen in the Client Portal. Here, they can see their affiliate links, count of leads, customers, and canceled customers that have signed up through their links.
How can affiliates view their payment information?
Affiliates can view their payment details on the Commission screen in the Client Portal. This screen shows the total amount paid to the affiliate, the amount owed by the affiliate admin, and the total revenue generated by the affiliate.
Can my affiliates see the details of the leads and customers who have signed up through their links?
Yes, affiliates can view these details on the Leads/Customers screen in the Client Portal.
What if the affiliate is part of an inactive campaign?
Affiliates can still view their stats even if they are part of an inactive campaign. However, their affiliate link will show as disabled, and they won't be able to use it until the campaign is activated.
Can affiliates see the reasons why customers canceled?
The Client Portal shows the count of canceled customers but doesn't provide specific reasons for cancellation. However, this information can be valuable in identifying trends or issues that may need to be addressed.
How often are the affiliate stats updated?
Affiliate stats are updated in real-time, so affiliates can always access the most up-to-date information in the Client Portal.
How to set up the Client Portal?
What is the Client Portal?
The client portal is a client-side interface located on the subdomain clientclub.net. It's a centralized platform designed to allow clients and leads to interact with their respective sub-accounts in a streamlined manner.
Centralized Platform:
The portal is a hub where clients can access their affiliate commissions, participate in community (upcoming) groups (upcoming), and enroll in membership courses. Having all of these functionalities in one place makes it easy for clients to manage their interactions with your business and services.
Custom Domains:
The portal offers the flexibility to set up a custom domain for each sub-account for a more personalized touch. This feature enhances the client's sense of ownership and can increase their engagement with your service.
Brandable Interface:
The portal can be customized to reflect each sub-accounts brand identity. By setting up their preferred logo, favicon, color scheme, and more, sub-accounts can provide a consistent and familiar experience to their leads and clients.
Improved Communication and Client Autonomy:
The portal facilitates easy and secure communication between you and your clients. Moreover, it empowers your clients by allowing them to take necessary actions independently. This level of autonomy can lead to increased client satisfaction and retention.
Easy Invitation:
The client portal provides easy ways to invite clients through child apps or by sharing the portal URL directly.
What are some strong usage cases for this feature?
1. Online Education Business (E-Learning Platforms):
If a business offers a variety of online courses across different subjects, the client portal allows students (clients) to access their courses, track their progress, and interact with other students in the community (upcoming) groups. It simplifies the learning process and fosters a sense of community (upcoming) among students.
2. Software as a Service (SaaS) Companies:
For a SaaS company with an affiliate marketing program, the client portal provides affiliates with a single platform to monitor their referrals and commissions. This transparency can motivate affiliates to promote the software more enthusiastically.
3. Fitness Industry (Online Training Programs):
If a fitness business offers different online training programs, the client portal can be used for members to access their specific workout plans, participate in fitness communities, and view their progress over time.
4. Marketing Agencies:
For a marketing agency that manages several clients (each being a sub-account), each client could have their custom domain in the client portal. This allows the clients to feel more ownership over their data and campaigns and streamlines the communication process between the agency and its clients.
5. Retail E-commerce Businesses:
An e-commerce business can use the client portal to invite loyal customers to a VIP program. The customers can log in to view exclusive offers, track their points or rewards, and participate in special community (upcoming) events.
6. Event Planning Companies:
Event planning companies can customize their client portal according to each event's branding. Clients can access event-related documents and updates and communicate directly with the planners.
What are some benefits of this feature?
1. Streamlined Access to Information:
By centralizing all key functions and data (like affiliate commissions, community (upcoming) groups, and membership courses) in one place, clients can easily find and access the information they need without navigating through multiple platforms or interfaces.
2. Improved Client Autonomy:
Clients have the flexibility and power to take action independently. This can lead to increased satisfaction as clients can solve problems or answer their questions without needing to reach out for support.
3. Enhanced Client Engagement:
Exploring community (upcoming) groups can facilitate better client engagement, making them feel more connected to your service. This sense of community (upcoming) can increase client loyalty and retention.
4. Consistent Brand Experience:
The branding feature allows businesses to provide a consistent brand experience across all client interactions. Consistency is key to building a strong brand identity, which can further enhance client trust and loyalty.
5. Easier Client Onboarding:
The client portal simplifies the onboarding process. Instead of sending multiple emails or using multiple platforms, you can invite clients to the portal, where they can find everything they need.
6. Increased Credibility with Custom Domains:
A custom domain not only gives clients a sense of ownership and familiarity but also increases the credibility of the sub-account in the eyes of the clients.
7. Efficient Communication:
With a client portal, communication with clients becomes more efficient as you can reach them all in one place, and they can access and respond to the communication at their convenience.
How to set up your client portal?
We have implemented a robust client portal system for each sub-account on our dedicated subdomain, clientclub.net. This portal facilitates effective interaction between clients and their associated accounts. However, during the setup process, we offer a flexible feature for each sub-account to personalize its portal by selecting a unique custom domain. This customization allows sub-accounts to reinforce their branding and enhance their client's familiarity with the platform.
Configuring a custom Domain:
To configure a custom domain for your client portal, follow these steps:
Using the left sidebar, navigate to the Sites tab then the Client Portal section. Proceed to the "Domain Setup." area. Click on the option for a Custom domain and input your desired domain name.
Before you can successfully set up an A or CNAME record, you must ensure that you have already configured your domain registrar to point to the specific IP address or server provided to you. This is an essential step in ensuring that your domain correctly refers to your server, enabling it to function properly.
A Record, also known as an Address Record, maps your domain to an individual server IP address. On the other hand, a CNAME record, or Canonical Name record, is used to map your domain (or subdomain) to another domain name.
Here's a step-by-step guide on how to add A records and CNAME records:
1) Login to your Domain Registrar's dashboard.
2) Navigate to the DNS settings. Here, you will find an option to add a new record.
3) Select the type of record you want to add (A or CNAME).Enter the details - for an A record, this would be the IP address 34.67.19.69; for a CNAME record, this would be the target domain preview.clientclub.net
4) Save your changes.
Different registrars might have slight variations in the procedure, so here are some specific guides for popular registrars:
GoDaddy
NameCheap
BluehostHost
Gator
Google Domains
Please note: It's important to replace the "designated IP address or server" placeholder with your actual IP address or server information in the record. Make sure to fill out this field accurately, as it's essential to correctly configure your domain settings.
Once you have entered the DNS records in your Domain registrar, give it a reasonable time to propagate them (depending on your domain registrar), and hit Update Domain.
Please note:
While the following resources provide a good general overview, the exact time of DNS propagation can vary due to several factors, such as the TTL set for the DNS record, your ISP's update frequency, and geographical factors. Typically, it is suggested to allow between 24 to 48 hours for DNS propagation.
Siteground: "Understand DNS Propagation & Why it Takes so Long"
GoDaddy: "What factors affect DNS propagation time? | Domains"
HostGator: "Propagation Times | HostGator Support"
DomainKing.NG: "DNS Propagation – how long does it take?"
AccuWeb Hosting: "How long Nameservers propagation could take after ..."
Namecheap: "DNS Propagation – Explained - Domains"
Webcentral: "What is the standard DNS propagation period?"
Branding your Client Portal:
Please Note:This message means that before you can access and modify the branding settings for your Client Portal, you first need to complete the domain setup process.
The domain setup process involves connecting your chosen domain (e.g., www.yourbusiness.com) to the Client Portal system. This connection is crucial because it is what allows your clients to access the portal through your selected web address. It's essentially the foundation of your Client Portal.
Once your domain setup process is successfully completed, you'll be able to move forward and access the branding settings for your Client Portal.
If you do not want to set up a custom domain, just clicking on Setup Domain will be enough and it will add your sub account's location ID as the prefix to the clientclub.net domain to be used as your Client Portal URL.
Access the Client Portal Section:
Start by navigating to the client portal section within your account. This is typically accessed via the left navigation menu when logged into a sub-account.
Go to Branding Option:
You'll find various options once you're in the client portal section. Locate and select the "Branding" option to begin personalizing your portal.
Customize the Portal's Appearance:
Within the "Branding" section, you can fully customize the look and feel of your client portal. Here are the options available:
Portal Name:
Enter a name for your portal. This is the name that will be displayed prominently on your portal.
Portal Description:
Add a description for your portal. This description will be visible to your clients and should briefly describe your portal or its services.
Brand Color One:
Choose the primary color to represent your brand in the portal. This color is often used for buttons, headings, or highlights.
Brand Color Two:
Choose a secondary color to complement your primary color. This adds depth and variety to your portal's color scheme.
Favicon:
Upload a favicon for your portal. Favicons are small icons that appear in the tab of a browser when your website is open. They should ideally be in a 1:1 aspect ratio, in SVG, PNG, or JPG format, with maximum dimensions of 16x16 pixels.
Portal Image:
The "Portal Image" section in the Client Portal allows you to upload your brand's square (1:1 aspect ratio) image in SVG, PNG, or JPG formats. The image dimensions should not exceed 720x720 pixels. This image will serve as the main branding image in your Client Portal.
Logo:
Upload your brand logo to be displayed on the portal. Like favicons, logos should be in a 1:1 aspect ratio, in SVG, PNG, or JPG format, with maximum dimensions of 200x200 pixels.
Support Email:
Specify an email address your customers can contact for support or questions related to the portal.
Copy Right:
You can enter copyright information here. This is typically something like "© 2023 Your Company Name." It helps protect your content and establishes your company's claim over the content.
Save Settings:
After making all the desired changes, don't forget to click "Save Settings" to ensure your customizations are applied to your client portal. If you change your mind or need to revert to the old settings, click "Cancel" before saving the settings.
Invite Clients to your client portal.
Inviting clients to your client portal enhances their experience with your services and fosters a sense of community (upcoming). The client portal serves as a central location for your clients to access important information, updates, and resources pertinent to the services they've availed of from your business.
There are two primary methods to invite your clients to the portal:
Direct Invitation from Child Applications
Your portal includes various child applications or services, such as a membership course, community (upcoming) platform, affiliate program, etc. You can extend invitations directly from these specific applications.
Membership Course:
Existing membership users will have dual accessibility - they can access courses through the traditional method as well as through the client portal upon login. Their current username and password will function in both locations. For those locations with no existing courses, they will need to set up directly in the client portal.
Community Platform:
(Upcoming)Affiliate Program: You can extend an invitation from the affiliate management system for your affiliates. Head to Marketing> Affiliate Manager> Campaigns> Edit Campaign.
Copy the signup link to share with people you want to invite:
This enables them to sign up as an Affiliate and access all their affiliate-related information through the client portal, such as their referral links, commission rates, and earnings.
Sharing the Client Portal URL
If you want to take a more direct approach or invite a large number of clients at once, you can share the URL of your client portal. You can easily copy this URL from the domain setup section of your client portal's settings.
Once copied, this URL can be shared via email, text message, or any other communication channels you use to interact with your clients.
You might consider incorporating this URL into a welcome email or newsletter for new clients or posting it in an announcement on your main website or social media platforms.
Remember, your client portal is a hub for all your services. So, when sharing the URL, make sure to highlight the benefits and resources clients will gain by accessing the portal. This could include exclusive content, direct support channels, access to community (upcoming) discussions, and more.
I've branded my client portal, but the changes aren't showing up. What could be the issue?
It might be due to cache issues. Try clearing your browser's cache or try to view the portal in an incognito window. If the issue persists, please get in touch with our support team.
Can I set different branding for different sub-accounts in the client portal?
You can set individual branding for each sub-account within your client portal. This feature allows you to tailor the visual elements of each sub-account portal, such as logos and color schemes, to represent its specific brand identity best. To do this, you must navigate to the sub-account, access the "Branding" option, and customize it as your preference.
My affiliates are having trouble accessing their stats on the client portal. What should I do?
Ensure that the affiliates have the correct login details. Also, check if you've given them the right permissions to access their stats. If the problem continues, contact our support team for further assistance.
I've set up the DNS records for my client portal correctly, but it's not accessible. Why?
DNS changes can take up to 48 hours to propagate across the internet. It may not be reflected immediately if you've just recently made changes. If it takes longer than 48 hours, please get in touch with your domain registrar for support.
I want to customize the favicon for my client portal, but it's not uploading. What's the ideal format and size for the favicon?
The recommended aspect ratio for the favicon is 1:1. The favicon should be in SVG, PNG, or JPG format and not exceed 16x16 pixels. If your favicon meets these specifications and you're still facing issues, please get in touch with our support team.
How can my customers use the Client Portal?
The Client Portal is a one-stop digital hub designed to offer your customers an easy, streamlined, and interactive engagement with your business. This guide will walk you through the ins and outs of how your customers can make the most of the Client Portal. Dive in to learn about the sign-up and login processes and the enriched customer experience that the portal promises.
What is the Client Portal?
The Client Portal is a centralized platform where customers can conveniently engage with your business and access various features. By utilizing the Client Portal, you can provide your customers with a more personalized and contemporary experience when they review their interactions with your business. It offers a comprehensive overview of all their past and present engagements, allowing them to gain insights into their history with your business. Customers can effortlessly monitor their affiliate commissions and payouts within the Client Portal, access their membership courses, and join community groups.
How can my customers use the Client Portal?
Signup process
Step 1: Who needs to go through the Client Portal Signup?
Clients only need to sign up for the Client Portal if they cannot access child apps (Membership Courses, Affiliate Manager, Communities>Upcoming).If they have been granted access to child apps before, they can log in to the Client Portal directly, thus skipping the redundant sign-up process. They can use the same credentials they have for their Membership portal to log in to the Client Portal
Please Note: This is designed to streamline the user experience and prevent the need for multiple registrations.
Step 2: Account Creation & CRM Restrictions
Clients can sign up multiple times with the same email address if your Business Profile Settings permit duplicate contacts. Each registration creates a distinct user account.
If the CRM does not allow duplicate contacts, clients cannot sign up more than once with the same email. The system will prevent creating multiple user accounts linked to one email address to uphold data integrity and avoid confusion or data duplication.
Please Note: Know your CRM settings and their implications on client account creation for the Client Portal.
Step 3: Registration Process
To register for the Client Portal, clients must provide their full name and email address and choose a password.
After they submit these registration details, the system will send a verification code to the provided email address.
Please Note:
Ensure the clients know to check their email (including spam/junk folders) for the verification code. The Verification codes expire after 15 minutes.
Step 4: Account Verification
Clients must enter the verification code sent to their email address to authenticate their account.
After successful verification, they can log in to the client portal using their selected password during registration.
Please Note:
The verification process is critical for maintaining the security and authenticity of client accounts.
Tip:
Advise your clients to keep their login details secure and remind them not to share this sensitive information with others.
Login
Clients can access the client portal by logging in using one of two methods:
Password Login: Clients who already have a password can use it to log in directly to the client portal.
Email Verification: Alternatively, clients can authenticate their identity using a secure code sent to their registered email address. Upon selecting this method, an email containing a unique, time-limited secure code is sent to the client. This code must be entered on the login page to verify the client's identity and grant access to the client portal.
When multiple accounts are associated with the same email ID, the system provides an extra layer of functionality to ensure the correct account is accessed. When attempting to log in, the system will prompt the user to select from a list of user accounts associated with that email ID. This avoids confusion and helps ensure that clients access the correct account.
Please Note:
In case of multiple accounts tied to one email, always double-check the account you select to ensure you're accessing the right information.
The Client Portal Experience
The Client Portal is a comprehensive hub where leads and clients can interact with your business through various child apps. This includes access to membership courses, participation in community groups, and managing affiliate relations.
To fully engage with these services, leads, and clients must complete their profile details. This information helps customize and enhance their individual experience and ensures smooth operation across all child apps. Completing the profile involves providing necessary information such as name, email address, contact details, and preferences.
Please Note:
Newly created locations currently do not support the use of magic links within the Client Portal. However, this functionality is under development and will be available in the near future. Please be aware that existing locations will continue to have access to magic links as usual.
Once their profiles are complete and they have gained access to the child apps, leads and clients can seamlessly switch between them, offering a unique interaction with your business. The app switcher, located at the top right corner of the top bar, facilitates this effortless navigation. A drop down menu will appear by simply clicking on the app switcher, listing all accessible apps. Users can then easily navigate to their desired app with just one click.
Please Note: Completion of profile details is mandatory for the best user experience and seamless operation across all apps.Always ensure your profile information is up-to-date and accurate, as it influences your interactions across all child apps.
Use the app switcher for quick and easy navigation between the different apps. It's there to enhance your user experience; make sure to make the most of it.
Can a client with multiple accounts switch between them within the Client Portal?
If clients have multiple accounts associated with the same email, they will be prompted to select the specific account they wish to log into. The user can then switch between accounts as needed.
Is it necessary for clients to complete their profile details?
Yes, completing profile details is necessary as these details are utilized across all child apps. It helps provide a seamless and personalized experience across all platforms.Question: Can clients directly switch between child apps like membership courses, community groups, and affiliates in the Client Portal?Answer: Yes, the client portal includes an app switcher, located at the top right corner of the top bar. This enables clients to navigate between the different apps effortlessly.
What if a client forgets their password? Is there a way to still access the Client Portal?
Clients can still access their accounts using a secure code sent to their email. This feature allows clients to log into their accounts without remembering their password.
Customer Reviews
Get More Reviews. Get Found Online. Win More Business.
Copyright FinSuites 2026 - All Rights Reserved
We’re on a mission to build a better future where technology creates good jobs for everyone.